
This is the kind of project that GIMP is perfect for! By combining elements from two or more different images into one, you can create anything from a collage of holiday snapshots to a photorealistic dreamscape – it’s entirely up to you and your creative vision.
Quick Navigation
The Quick Guide to Blending Two Images
The basic process for blending two images in GIMP is quite simple:
- Step 1: Create a new image file or open your background image in GIMP.
- Step 2: Use the Open As Layers command in the File menu to open your second image.
- Step 3: Add a layer mask to the new image layer, and mask out any unwanted sections.
- Step 4: Use filters to adjust your new image layer to match your background image layer, if desired.
If you want to add even more images, you can just repeat steps 2-4 until you’re finished! For those of you who are new to GIMP and not familiar with the process of using layer masks, I’ll provide a more detailed guide below, along with some tips for creating the best possible blends and some inspiration for advanced image blending processes.
The Detailed Guide to Blending Two Images in GIMP
This guide will let you blend any images together, and can be repeated as many times as you want – although if you add too many images together, you might start pushing the limits of what your computer can handle!
I’m going to do a very basic combination of two images: a hawk in flight and a stormy sky. It’s a nice shot of the bird, but the background is pretty boring, so blending it with a new stormy sky background would make for a more dynamic and appealing image.
Step 1: Image Prep
First and foremost, open one of your images in GIMP to use as the background. In this case, I’ll use the storm sky image, but you’ll have to select based on the images you’re using.

Next, open the File menu and select Open As Layers. Select your second image in the file browser, and click Open. Instead of opening it as a separate image, GIMP will create a new layer in the Layers panel using the contents of the image.
If you can’t choose which image to use as the background because neither of them is a good choice, you could create a blank new image in GIMP and open both of your images using the Open As Layers command.
Step 2: Layer Masking
At the moment, one image is overlaid on the other, but it will just have standard rectangular image borders (unless you’re using a transparent PNG or GIF). I’ll need to hide the unwanted areas of the sky background in the hawk photo to make it look more natural against the storm sky image.
You can simply erase the background using the Eraser tool, but if you make any mistakes or change your mind about the edit later on, you’ll have to start it all over again.
Layer masks are a much better method to prune away unwanted pixels because layer masks hide the pixels instead of actually deleting them. If you change your mind later, you can adjust the mask with a few brushstrokes.
A layer mask is a secondary image layer that determines what sections of a layer are visible and which are hidden using a simple grayscale.
If a pixel is white on the layer mask, the corresponding pixel on the main layer is visible, and if a pixel is black on the layer mask, the corresponding pixel is hidden from view. Gray tones allow for partial transparency and allow you to make perfect blends between two images.

I’ll add a layer mask to the hawk image by opening the Layer menu, selecting the Mask submenu, and choosing Add Layer Mask.
You can also right-click on the layer name in the Layers panel and choose Add Layer Mask from the popup menu, or select your layer name and click the small mask icon at the bottom of the Layers panel.
GIMP will open the Add Layer Mask dialog box, with a few simple options. In this case, I’m going to set the Initialize Layer Mask to: option to White (full opacity). This will fill my layer mask with white pixels, so the entire layer will remain visible for now.

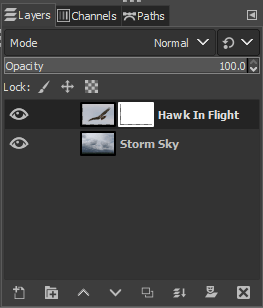
Click Add, and the layer mask will be added to the currently selected layer. A new thumbnail will appear in the Layers panel, showing our new layer mask all filled with white pixels.
It’s a bit hard to see at the moment, but there’s also a white outline around the layer mask to indicate that it’s currently active. Any edits that we make now will change the layer mask, not the main pixel layer.
Switch to the Paintbrush using the toolbox or the keyboard shortcut P, and set the foreground and background colors to the default black and white by pressing D.
You can switch the foreground and background colors quickly using the X key, which will allow you to quickly and naturally outline the subject of your secondary image.
With the foreground color set to black, begin painting on the layer mask and you’ll see the pixels disappear from view, allowing the layer underneath to show through.
You’ll probably need to zoom in quite close to do this job properly, and you’ll want to get very familiar with the shortcuts mentioned earlier so that you can create your mask intuitively.

If you want to edit the main pixel layer again, click the other thumbnail in the Layers panel. If you want to go back to the mask, click its thumbnail instead.
Step 3: A Bit Of Polishing
After you’ve finished your masking, take a step back (zoom out a bit!) and take a fresh look at your image. Does it look like a natural blending of the two images? What stands out?
In my example, I need to do some color adjustments to the hawk to make it look a bit more natural in the new background, but your image might need something else.
Hue-Saturation, Color Temperature, and Curves can all be very useful when it comes to this final stage, but it’s really all up to you at this point. Part of the skill of being an image editor lies in determining just what the differences are in your image and then using the right tools to correct them to create a seamless composite.
Of course, you might not want to bother creating realistic blendings – you can use this technique for any kind of image collage you want to make.
Getting the Best Image Blends
If you want to create photorealistic blends of multiple images, there are a few tips that will help your workflow dramatically.
Choose your source images carefully. Differences in color balance, lighting, and perspective stand out the most when you’re combining two images. The closer these factors are between your two source images, the more realistic your final blend will look.
Take time on your masks at first. Automatic selection tools can sometimes give you a headstart on your masking, but nothing will ever create a better result than carefully masking difficult edges by hand.
Explore the paintbrush tools and get used to working with the keyboard shortcuts to dramatically improve the quality and efficiency of your masking.
Get used to working with layers. As you expand your skill set, you’ll probably wind up combining quite a number of layers. Getting comfortable with the layer options, blend modes, and layer groups will make it easier to work with lots of layers in one image.
Advanced Image Blending
If you want to get technical with blending images in GIMP, there are plenty of creative projects you can try: HDR compositing, focus stacking, time-lapses, and other optical illusions all depend on combining multiple image elements into a new whole.
Some of those projects will definitely be easier to do with one of GIMP’s filters or a third-party plugin, but once you start realizing what you can create by blending two or more images in GIMP, the world of digital art opens up to you.
Happy blending!
About Thomas Boldt
David
I want to do exactly as your example shows, but the process breaks down after the layer is added. I just want to make the layer transparent, then move it to a new position.
Thomas Boldt
Hi David, I’m not sure that I understand your question exactly, but I think you’re talking about the step where you add the layer mask. Essentially, the layer mask hides all the parts of an image layer that you don’t want to be visible.
In my example of the hawk and the storm background, I added a layer mask to the hawk image layer, then painted black pixels on the layer mask to hide all the parts of the hawk image that I didn’t want to display, such as the blue sky background.
I hope that helps!
Serkan
Today´s tuturial was the best one for me on the first page. Thank you for time and knowledge!
Thomas Boldt
You’re welcome, Serkan! I’m glad you’re finding the site helpful.
Wilfried
Steps 1 to 4 are oke. But how to create the blended result and how to save the result ???
Thomas Boldt
Hi Wilfried, the blended result is automatically created by combining the layer stack into a single image while you view it! You can merge the layers into a single layer using the Merge Layers command in the Layers menu if you want to, but I recommend that you keep the layers separate and save your work as an XCF file, in case you need to edit it later. Once you’ve saved your file, you can export it as a JPEG, PNG, TIFF, or any other image format you want, and the layers will be automatically flattened during the export process.
I hope that helps!
Aquila Noctis
Hi Thomas,
I am trying your tutorial for merging into one JPEG, 2 half scans of my diploma, which is a big paper.
Those 2 scans have a small overlapping.
I am able to follow your tutorial until open the second as layer, but I cannot move them to put together like a puzzle, do you know by the chance an easier choice for it?
Thanks
Thomas Boldt
Hi Aquila, that project should definitely be possible without using masks! As long as you open the two half scans as separate layers, you should be able to reposition them so that they line up.
It’s “best practice” to use masking to make sure the two halves line up perfectly instead of actually deleting the pixels, but for a quick project like this, you don’t *have* to do it that way. You can always just use the Rectangular Selection tool to delete parts of each layer that you don’t need until they match up properly.
Hope that helps!
Chris M
Much appreciated, Thomas! You’ve just opened up a whole new world for me.
Thomas Boldt
You’re welcome, Chris! Have fun with it!
Billy Stirling
Hi Thomas,
I am looking to cut a person out from one photo and place in another. The two photos where taken with one person changing positions. Its actually myself standing behind my kneeling sister.
How can this be done?
Thanks
Billy
Thomas Boldt
Hi Billy, sounds like a fun project! The first step is to decide which photo you want to act as the ‘primary’ photo. This primary photo will act as the final background for your composition. Next, open the two photos in a single GIMP document using the Open As Layers command. Organize the two images/layers in the Layers panel so that your primary photo is on the bottom of the layer stack. The primary photo won’t be edited at all, so you can just leave it alone, since it will be playing ‘host’ to the other person’s photo. Finally, use a layer mask to hide the background of the secondary photo, and you’ll have a movable ‘person’ photo to adjust and position until it looks natural.
You’ll probably have to do some more editing to the lighting and so on to make it look like a realistic composite, but that’s the basic idea!
Hugues Debeyser
Thanks for this, can now try blending foreground and sky pictures in my astro journey!
Thomas Boldt
Sounds fun, Hugues! I’ve been meaning to explore astrophotography myself one of these days…