
Lens blur or bokeh is one of the most effective artistic tools available to a photographer. Even top-of-the-line smartphone cameras can blur backgrounds now, thanks to multiple cameras and depth sensors. But what if you’ve already taken a picture without a blurred background?
GIMP is a great tool for creating a blurred background or “selective focus” effect, and it’s not very hard to do. Like most problems that you encounter in image editing, there are a few different ways you can solve them, but the best option will depend on the specific photo you want to blur.

The two basic methods to blur a background in GIMP are the Blur Tool method and the Gaussian Blur layer method. The Blur Tool is quick and effective but not very precise, while the Gaussian Blur layer method takes more work but can produce very high-quality results.
There are a few other blur tools available in GIMP, but they don’t always offer the same degree of control, so we’re going to stick to the basics for this guide.
The Blur Tool Method
This is the quick and dirty method of blurring a background in GIMP, but it will do the job. You won’t have as much control over the final outcome, but you can be done in just a few brushstrokes if you don’t care about precision (or if you have a simple subject shape to isolate).
The Blur Tool is nested under the Smudge Tool in the GIMP toolbox, so click and hold on the Smudge tool and then select Blur / Sharpen from the dropdown menu. You can also load the tool with the shortcut Shift + U (for once it’s actually the same shortcut on macOS too!)
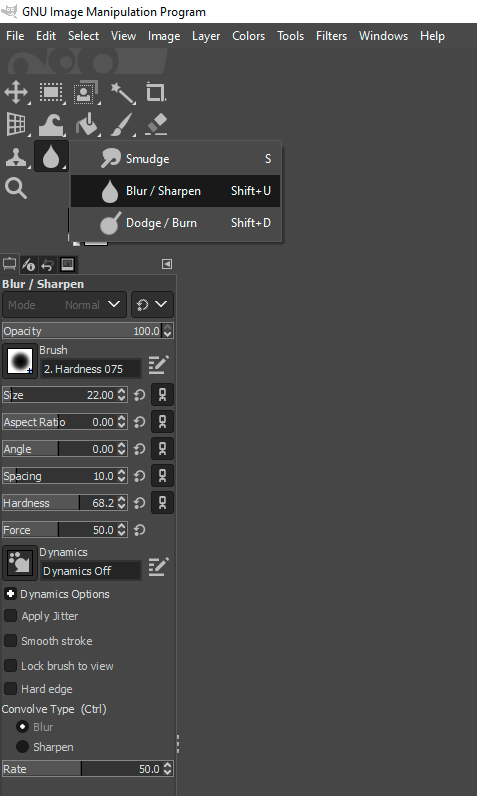
At this point, the process basically explains itself. Tweak your brush size, make sure the Convolve Type is set to Blur, and adjust the Rate setting at the bottom to determine how quickly/strongly the blur effect is applied by the tool.
Then you simply need to brush over the areas that you want to blur. If you’re working on a high-resolution image and a large brush, you’ll probably notice immediately input lag as GIMP struggles to keep up with the movement of your cursor, which can be frustrating to work through.
For larger images, the layer method is much more effective. It also allows you to maintain a consistent blur level, so you don’t have to worry about overlapping your Blur Tool strokes and creating patchy inconsistent blur amounts in different areas of your image.
The Gaussian Blur Layer Method
In case you haven’t guessed, this is the method that I recommend for most situations. It’s a bit more work, but you get a much greater degree of control over the final results. Once you get used to the process, it can be faster than brushing, undoing, and rebrushing with the Blur Tool.
To use the Gaussian Blur layer method, we’ll need to create a copy of your existing image on a new layer. Then we’ll apply a Gaussian Blur to that layer, and combine it with a layer mask so we can control where we see the blurred image and where we see the untouched sharp image.
Thanks to the layer mask, it’s possible to create some really cool effects fairly easily using gradients and a bit of mask editing. Let’s explore the process in a bit more detail so you can see how it works.
Open up GIMP and the image you want to blur, then find the Layers palette down in the bottom right of the interface. Right-click on the layer name and choose Duplicate Layer, or press Shift + Ctrl + D (use Shift + Command + D on macOS). Rename the new layer to “Blur Layer”.

Make sure you’ve got the Blur Layer selected, then open the Filters menu, select the Blur submenu, and then choose Gaussian Blur. Feel free to explore the other blur tools as well (more on them later on) but for our purposes, Gaussian Blur is best suited to the current job.

The amount of blur is set using the Size X and Size Y sliders, which are locked to match each other by default. We want that in order to maintain a consistent realistic look, so choose a setting you like by checking the results in the main editing window and clicking OK.
Now we’ve got our nicely blurred Blur Layer sitting over the top of our original untouched image. We’ll add a layer mask to the Blur Layer to control which parts of it are visible in the final composited image. Back in the Layers palette, right-click the Blur Layer and choose Add Layer Mask.
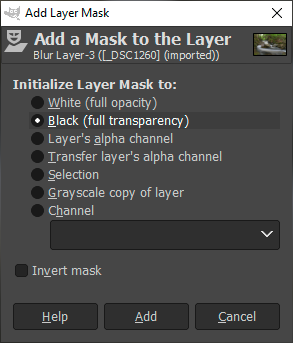
We’ll need to change the Initialize Layer Mask to: setting to Black (full transparency). Layer masks are non-visible black and white layers that sit over the top of existing pixel layers, where white pixels are 100% visible and black pixels are 100% transparent.
Setting the default mask color to black hides the blurred pixels on the Blur Layer, so we can see the sharp image beneath. Then we’ll use a normal paintbrush set to white on the Blur Layer mask, and anywhere that we paint will allow the Blur Layer to appear.
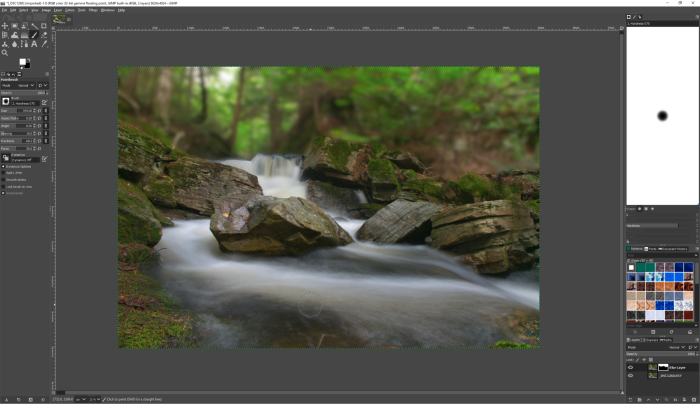
Things get really fancy when you start mixing in grays, as that allows you to make the effect seem to fade out into the distance with a gradient to mimic an actual lens blur. Right-click on your Blur Layer and choose Show Layer Mask to refine your mask until it’s perfect!
Advanced Blur Filters
As you probably noticed when opening the Filters > Blur menu, GIMP has a wide range of other blur options. Some even seem perfectly suited to blurring your background, and they’re ok for quick projects. Lens Blur and Focus Blur can be very useful in certain circumstances.
Wrapping Up
I still think that the Gaussian Blur method is the most direct and effective way to get an appropriate result, but as I said earlier, it’s important to choose the right tool for the job. Experiment with the options, see what works best for you, and choose for yourself!
About Thomas Boldt
Ryan Kimba
Hi Thomas! When I blur the background around a foreground subject, it leaves a white “halo” around the object that is not blurred. How would I get rid of that. I’ve been using paint brushes to brush over the halo to make it match the blurry background, but that takes FOREVER to do. I’m looking for a quicker solution.
Thank you!
Thomas Boldt
Hi Ryan, I don’t think I am familiar with the effect that you’re referring to – would you be willing to share a link to an image that shows the halo around a foreground subject?
Without seeing one of your images yet, my first suggestion is that you should check the ‘Feather’ setting in the Tool Options panel when you’re creating your foreground/background selection.
Barbra
Wow, this tutorial is a dud. It was going along so well until it just ended after you apply the layer mask. What’s up with that? And what in the world does it mean when you say, “Then we’ll use a normal paintbrush set to white on the Blur Layer mask, and anywhere that we paint will allow the Blur Layer to appear.” What is a normal paintbrush set? What does it mean to “white on” something?
Thomas Boldt
Hi Barbra, I’m sorry that you found the tutorial confusing! You’re right that the sentence could be phrased more clearly. The sentence in question means that you should use the paintbrush tool to paint white pixels onto the layer mask. When painted onto a layer mask, white pixels indicate that the corresponding portion of the associated image layer will be fully visible.
So within this tutorial, you create a blurred image layer with an associated layer mask. At first, the blurred image layer is completely hidden because the associated layer mask is filled with black pixels. But if you paint white pixels anywhere on the layer mask, that portion of the blurred layer becomes visible, which allows you to control which parts of the photo appear blurred and which parts are in focus.
I’ve also written a basic introduction to masking which would be a good place to start! You can read it here: https://thegimptutorials.com/how-to-mask/