
When I was a little kid, I used to wish that I could change my eye color at will, sort of like a little mood ring (give me a break, it was the 1980s, lol). I outgrew the desire, but when I started getting into digital photography and image editing, I will admit that I did a little bit of experimentation to see how it would have looked.
Let’s just say that I did not immediately go out and buy a lot of color contact lenses, but it was a fun project that helped me hone my image editing skills, and hopefully, you’ll get the same combination of fun and practical experience as you apply these steps to your project.
Of course, it doesn’t just work on pictures of people. I don’t do any human portraiture photography, but I do take an obsessive number of pictures of my cat, and so Juniper will be temporarily transformed into a guinea pig for this tutorial on how to change eye color in GIMP.

Quick Navigation
The Quick Guide to Change Eye Color In GIMP
If you just want the barebones outline, here’s how to change eye color in GIMP following three quick steps.
- Step 1: Duplicate the background layer of your image.
- Step 2: Add a layer mask to the new layer and mask out everything except the eyes.
- Step 3: Open the Colors menu and use the Hue/Saturation filter to adjust the coloration.
That’s all there is to changing eye color in GIMP! The same workflow also applies to almost any other kind of color shift you want to apply to your image, not just for changing eye color.
The more experienced editors among you have probably already switched back to GIMP to get working instead of reading any further, but if you’re just getting started with GIMP or you’re looking for a more detailed explanation, read on.
I’ll even include a picture of Juniper as a tiny kitten when she still had her naturally blue eyes before they turned yellow-green – as long as you’re good.
The Detailed Guide to Changing Eye Color In GIMP
While it’s possible to condense a complex project like this down into a few short sentences, there’s a lot of nuance to the process that gets lost. Here’s the much more detailed version!
Step 1: Duplicate Your Image
This step is pretty simple, but it’s important not to skip it. Duplicating your background layer so you don’t alter the original image is a technique known as non-destructive editing, although it’s a sort of halfway version rather than a properly non-destructive workflow.
Ideally, it would be possible to apply adjustment filters as separate layers for a simpler and truly non-destructive workflow, but they’re pretty still far down GIMP’s development roadmap. I’m hoping they’ll be added when GIMP 3 is released, but we’ll have to wait and see.

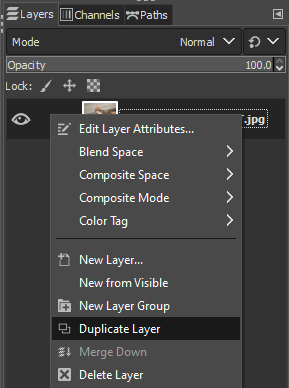
For now, duplicate your original image layer by opening the Layer menu and choosing Duplicate Layer. You’ll see in the menu that you can also use the shortcut Ctrl + Shift + D (or use Command + Shift + D if you’re using GIMP on a Mac) to achieve the same result.
It’s a good idea to get in the habit of renaming your layers so that you can keep track of which layer controls which adjustments or things can get a bit messy once you add more than a couple of layers in a single image.

Just double-click on the layer name text, and you’ll be able to type in a new name. Press the Enter key when you’re done to save it.
Step 2: Time To Mask Up
It sounds pretty cool, but the masking step is all about telling GIMP which part of the image we want to adjust.
A layer mask is an invisible guide that tells GIMP which parts of the layer are visible and which are not, so when we’re done, the only visible part of our newly duplicated layer will be the eyes we want to adjust.
Make sure your new layer is selected, then open the Layer menu, select the Mask submenu, and choose Add Layer Mask.

There’s no keyboard shortcut for this, but you can also right-click on the layer in the Layers panel and choose Add Layer Mask, or even click the tiny mask button from the row along the bottom of the Layers panel. They all do the same thing: open the Add a Mask to the Layer dialog.
As you’ll see in the dialog, there are quite a few options for how the layer mask will be initially configured. The two most common options are White (full opacity), which means your entire layer will still be visible, and Black (full transparency), where the entire layer is transparent.
Since eyes are generally a pretty small part of the image, it’s faster and easier to start with a perfectly transparent mask and only paints back in the small parts that we want to tweak.
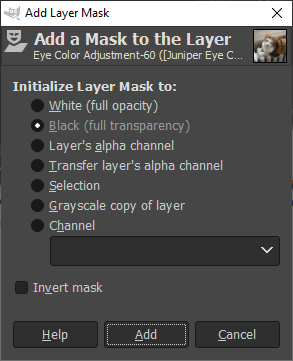
Select Black (full transparency) and click the Add button.
In the Layers panel, you’ll see a new thumbnail filled with black beside the original layer thumbnail that shows the duplicated image. It’s surrounded by a white border, indicating that the mask is currently active.
You can switch back and forth between editing the mask and editing the image layer by clicking the appropriate thumbnail.
Unfortunately, because of the way GIMP’s masking system works, it’s not possible to visualize the mask over the top of your image for easy masking, but there is a tool called Quick Mask that offers a bit of a workaround.
Turn on Quick Mask mode by opening the Edit menu and selecting Toggle Quick Mask at the bottom, or press the keyboard shortcut Shift + Q. Your entire image will be covered by a red overlay, but it’s just a temporary visual aid to help us.
Switch to the Paintbrush tool using the toolbox or the keyboard shortcut P. We’re going to use it to paint black and white in order to indicate what areas of the red Quick Mask area we want to select.
Any place you paint with white, the red overlay disappears, and if you paint with black, it returns. You can use the keyboard shortcut D to set your foreground and background colors to white and black, and use X to swap the foreground and background. Get used to these two!

Paint white pixels onto the areas you want to keep – in this case, the eyes of your subject – and leave the red overlay over areas you don’t want to adjust. Once you’re satisfied, toggle Quick Mask mode from the Edit menu again or press the keyboard shortcut Shift + Q again.
You’ll be left with a selection marquee around your subject’s eyes, or wherever you painted white pixels. Switch back to editing your layer mask by clicking the layer mask thumbnail in the Layers panel.
Now all that’s left is to fill the selected areas with white using the Paintbrush or the Bucket Fill tool, and you’ve got a perfect mask around the eyes.
Once you’re done filling them with white pixels on your layer mask, press Ctrl + Shift + A to remove the selections.
There are a lot of different ways that you can do this step, but this is the way that works best for me. You may find that you’ve discovered a different masking process that works better for you, and that’s awesome – it’s important to get comfortable developing your own workflow!
Step 3: Color Changing
Finally, we get to the fun stuff! Now that you’ve got a proper mask around the eyes, it’s time to change the eye color.

In the Layers panel, click the image thumbnail on your color adjustment layer to activate it, or you won’t be able to follow this step. There should be a white border around the image thumbnail in the Layers panel to indicate which is active.

Open the Colors menu and select Hue-Saturation. You could also use the Color Balance, Hue-Chroma, or several other filters at this point, it really depends on your preference, but Hue-Saturation is the simplest.

Adjust the Hue slider until you find the color that you want. Make sure the Preview button is checked so that you can see the results before you click OK to finalize the adjustment.

At this point, you might discover that your original mask wasn’t quite as good as you thought back in Step 2 – no problem! You can still switch back to editing the layer mask, and paint with white or black pixels to adjust which parts of the image receive the color adjustments.
This is why it’s important to use non-destructive editing techniques whenever possible – or as close as you can get in GIMP at the moment. It takes an extra step at the beginning, but it’s easy and saves you time later on if something needs refinement.
That’s all there is to know about how to change eye colors in GIMP! You can use the same technique on just about anything, now that you know the secrets of masking.
And because I totally did promise it, here’s a picture of Juniper when she was just a few weeks old and her eyes were naturally blue =)

Happy editing!
About Thomas Boldt
Eric Johansson
Thanks so much Thomas. Very helpful and easy to follow tutorial. +++