
The first time you open a new image editing program, there’s always a huge number of things to learn. Even if you’ve only used a few other editing programs before, there are some common interface design decisions that feel immediately familiar.
But what about the very first time you ever use any kind of image editing program?
If you’ve never opened GIMP before, you might feel a bit overwhelmed when you realize how much there is to learn – but don’t stress yourself, TheGimpTutorials.com has you covered! Changing your paintbrush color is very easy, once you know how it works and where to look.
Locate the toolbox panel, which is usually located in the upper left corner of the GIMP window by default. Yours might be scaled a bit differently than the example shown below, but the basic principle is the same.
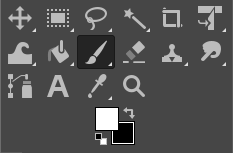
The icons allow you to quickly switch between GIMP’s various editing tools. The two colored squares below, currently showing white and black, indicate your currently selected foreground color (white, in this example) and background color (black, in this example).
You can change your foreground color by clicking the square in the upper left (the white one, in the image above). GIMP will open a complete picker window, providing a wide range of options for selecting a new foreground color.

Use the color spectrum to choose a hue, and then set the saturation and value using the larger color area. The Current: section will adapt to show the currently selected color.
You’ll notice that there is a row of small icons above the large color picker area, which provides a few different interactive ways to select your new color. Feel free to experiment with these until you find one that you’re happy with, although some of them can be quite confusing at first and it’s simplest to stick with the GIMP default.
It’s also possible to select a color by entering specific RGB or Lch values on the right side of the color picker window. You can even select a color using the hex color codes used in website development, which is perfect if you’re trying to color-match with an existing design.
The exact same process applies for selecting your background color, except that you start by clicking the other colored square below the toolbox area, shown as black in the example above.
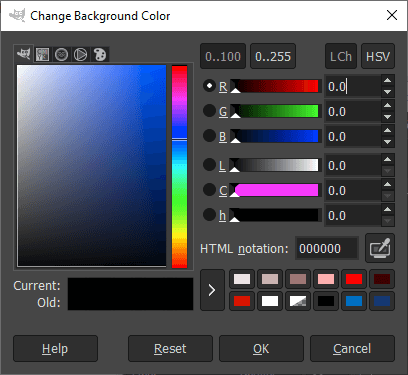
You’ll note that the color picker window indicates that you’re choosing the background color in the title bar instead of the foreground color, in case you get mixed up.

If you want to return your foreground and background colors to the default black and white setting, you can click the small black and white square icons in the bottom left of the color display area. You can also swap your foreground and background colors by clicking the small two-headed arrow icon in the upper right of the color display area.
These colors are used by GIMP in a number of different situations, including erasing, gradients, and more, so it’s a good idea to get familiar with setting them up the way you want!
My Paintbrush Color Doesn’t Match!
If you have followed the steps above and you still can’t change your paintbrush color, it’s possible that the image you’re working on is set to a specific color mode that is preventing you from using your selected Paintbrush color.
The vast majority of digital images use the RGB color mode, which combines three color channels – Red, Green, and Blue – to make any color your eye can see. There are actually several more common modes such as LaB, CMYK, Indexed, and Grayscale modes, but GIMP only supports RGB, Grayscale, and Indexed modes at the moment.
Indexed mode is typically used in GIF images as a way of reducing the available color information in an image as a way of reducing file size, and Grayscale does exactly what it says on the tin: purely grayscale images, better known to most people as black and white images.
If your image is set to grayscale mode, your color picker will work exactly the way I explained earlier, except when you actually start to use the Paintbrush, you’ll only be able to paint with the shade of gray that corresponds to the value of your chosen color.
I’m not sure why GIMP doesn’t indicate your color mode while actually using the color picker, but there’s probably a good reason for it – though the option to customize the display would be nice.

To switch your color mode, open the Image menu, select the Mode submenu, and click RGB. Once you’re in RGB mode, you should be able to paint with your selected color anywhere on the canvas.
That covers everything that you need to know about how to change paintbrush colors in GIMP! If you’re still having a problem, drop me a message in the comments section below and I’ll see what I can do to help.
About Thomas Boldt