
You probably noticed that the title of this post is a bit odd, but however you got here, I can show you how to draw any kind of shape you want in GIMP using a few simple tools. Like most things in GIMP, there are several ways you can create shapes in GIMP, so let’s start with the simplest one.
Quick Navigation
Method 1: Making a Solid Shape
This method will allow you to create solid shapes filled with a single color, a pattern, or a gradient. If you want to create an outlined shape, try Method 2 or Method 3.
Step 1: Create A Selection
With your image open in GIMP, switch to the Rectangle Select tool using the toolbox or by pressing the keyboard shortcut R.
Click and drag on your image to create a rectangle or square. GIMP will outline the selection and provide adjustment handles at the four corners for resizing, and along each edge for constrained resizing along a single edge (although these will be hidden until you hover the cursor over the selection).
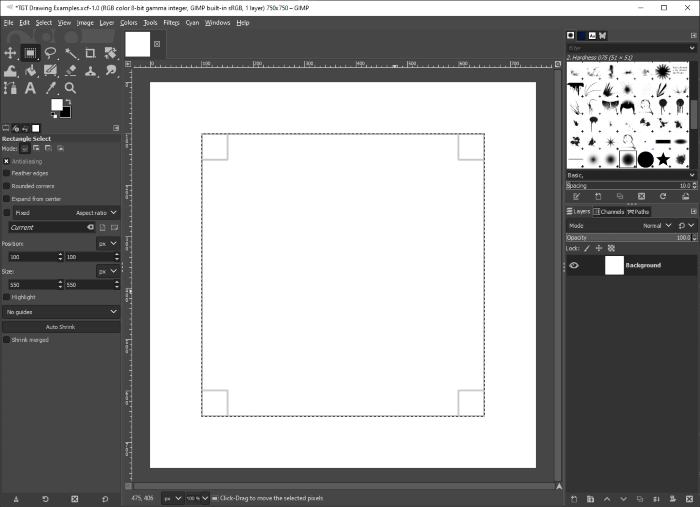
You can also hold down the Alt key (Option on a Mac) and click and drag to reposition your entire selection area.

If you want to be precise about the location without having to place the selection by hand, you can also use the Tool Options panel on the left dock to type in a specific location and size, based on the upper left corner of the selection area.
You’ll need to have started drawing a selection already, and GIMP will reposition it for you based on your input.
Once you’re happy with the size and position of your selection, press the Enter key to finalize it.
Step 2: Fill Your Selection
Now for the fun part! If you want to fill your selection area with a solid color, select it using the color picker at the bottom of the toolbox. The upper left color swatch is your foreground color, and the bottom right color swatch is your background color.

Switch to the Bucket Fill tool using the toolbox or the keyboard shortcut Shift + B. Check the Tool Options panel and make sure the Fill Type is set to FB color fill (although you can use BG color fill or Pattern fill if you want to), and Affected Area is set to Whole Selection.
Then simply click anywhere inside your selection, and GIMP will fill it with your chosen color or pattern.

If you don’t want to use the Bucket Fill tool, you can quickly fill a selection area with the current foreground color by pressing Ctrl +, (that’s a comma, in case it isn’t clear) or fill with the current background color by pressing Ctrl +. (that’s a period, even though my grammar checker is mad about it).
You can also fill your selection with a gradient by switching to the Gradient tool, which is nested in the toolbox underneath the Bucket Fill tool, or you can use the keyboard shortcut G. Set your Tool Options as desired, and then click and drag anywhere inside your selection to fill with your chosen gradient settings.
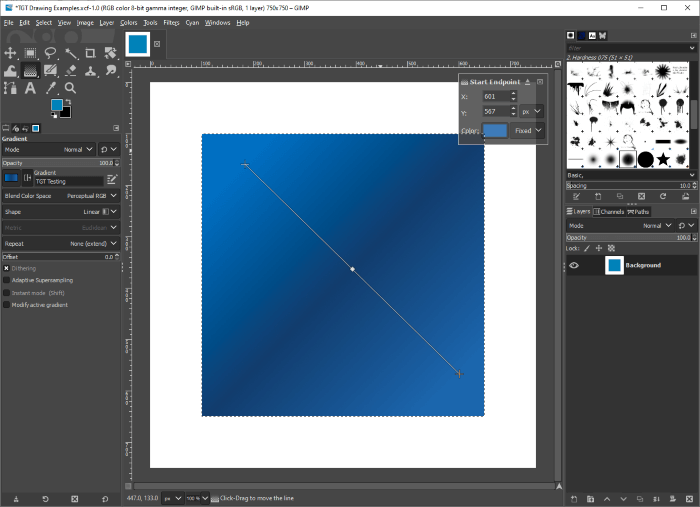
You can repeat this process as many times as you want, although I recommend that you put each different rectangle/square/box on a separate layer so that you can move them around independently of each other later on.
Method 2: Making An Outlined Shape
This method is fairly similar to Method 1, although we’ll use a different technique to create an outline of the selection instead of using a solid color, gradient, or pattern fill.
Step 1: Create A Selection
Create your selection as before using the Rectangle Select tool. I won’t rehash the same details over again, since this is a fairly basic step.
Step 2: Apply A Stroke
If you’re not familiar with the terminology, this isn’t some scary medical condition that can affect your image. Instead, applying a stroke essentially means drawing a line or brushstroke around the selection area.
Open the Edit menu, and click Stroke Selection.
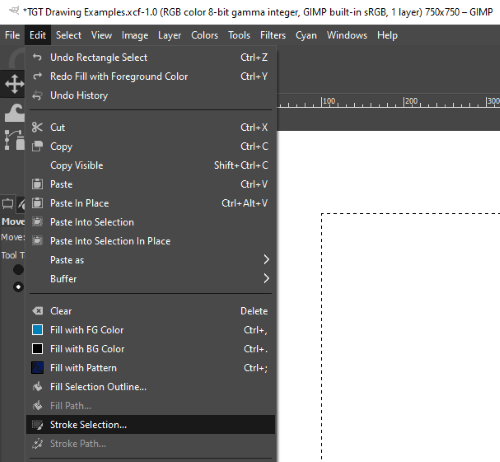
GIMP will open up the Stroke Selection dialog box, which is full of all sorts of ways to customize the stroke that will be applied to your selection.
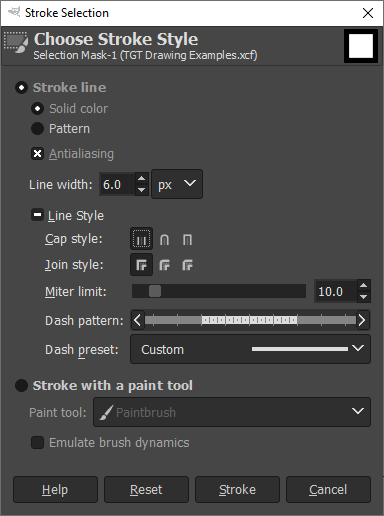
You can apply a simple line, a pattern, or even a paint tool complete with emulated brush input dynamics, although these dynamics won’t be as effective as if you’d actually hand-drawn the stroke.
Choose all your settings, and click the Stroke button to finalize it.

This is probably the most flexible way of creating a rectangle/box/square in GIMP, and it can be combined with Method 1 or Method 3 to create more complex effects.
Method 3: Drawing Straight Lines In GIMP
If you don’t want to use either of the selection methods, there’s one last option that might work for you.
It’s possible to draw perfectly straight lines in GIMP using one of the many brush tools – and I don’t mean cheating by using a ruler on your drawing tablet, which is silly. Usually, I wholeheartedly approve of silly things, but you don’t want to damage your tablet’s drawing surface!
This method has the advantage that it works with any of GIMP’s brush-based tools, from the Paintbrush to the Clone tool, which creates some interesting possibilities depending on the settings you choose.
Select your chosen tool, and click at a point where you’d like to have one corner of your shape. Hold down the Shift key, and move your mouse to the next corner. While you’re holding the Shift key, GIMP will automatically draw a straight line between the two points, showing the path that your auto-filled stroke will take.
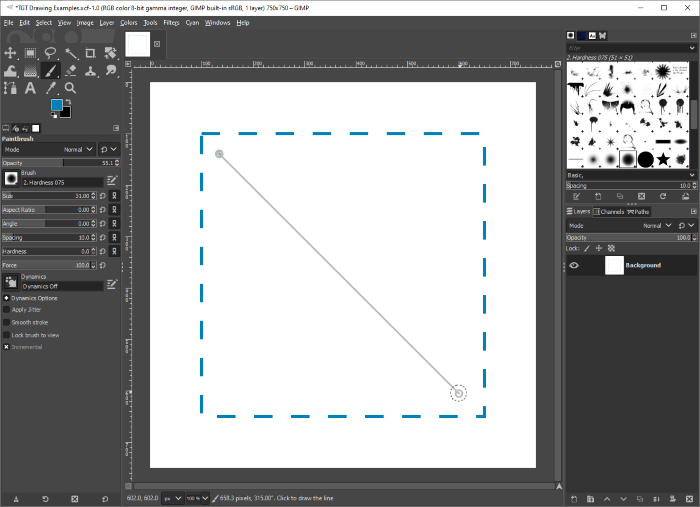
However, that’s only good enough to draw straight lines. For a proper rectangle/square/box, we’ll need to constrain the angle too. While still holding down the Shift key, hold down the Ctrl key as well, which will constrain your angle to 15-degree increments.
That will allow you to draw any kind of straight-edged polygon that you want, from squares to boxes to hypercubes!
About Thomas Boldt
Rafael
For some reason, Method 2 flat out doesn’t work for me. I make the selection. Click Stroke Selection. I select a simple continuous line, click “Stroke” and absolutely nothing happens. Tried using different colors, different options in the toolbox, checked if the selection wasn’t picking something else up, increased line width, nothing. Honestly, I’m at my wits’ end with this software, nothing I want to do seems to work as intended. I’ve no idea why every single tool needs to be this convoluted and unresponsive.
Thomas Boldt
Hi Rafael, unfortunately, I know exactly how you feel – sometimes GIMP can be extremely frustrating for no obvious reason. It sounds like you’ve checked most of the basic potential causes already, so there are only a couple more things I can think of that might be worth trying:
1) Check the Layers panel to make sure you’re drawing on the proper layer. Additionally, if your layer has a mask, you might want to check it’s not accidentally selected.
2) If that’s not it, the layer you’re working on might only be the exact size of your selection, so the stroke you draw around it gets ignored by GIMP because it’s technically not inside the layer boundary (which is not always the same as the document size). This is one of the more annoying features of GIMP layers, in my opinion, but there are some situations where it’s helpful. To fix it, select the layer in the Layers panel, then open the Layers menu and select ‘Layer to Image Size’. This will expand the layer to the full size of your document, and maybe that will fix the issue.
Hope that helps, because I can’t think of anything else that might be causing the issue!
simone
Useful!
I don’t understand why after so many versions GIMP refuse to add a button dedicated to complex form to speed-up drawing, but after all it is not even possible to draw a straight line without looking for it in the manual or on the internet.
Thomas Boldt
I’ve wondered the same thing myself, Simone, but I think there are at least two reasons behind it: 1) they’re busy working on GIMP 3, and 2) the developers have always said that GIMP isn’t really supposed to be a ‘drawing’ app, even though it is possible to use it that way. If you’re looking for a high-quality free/open-source drawing app, you might want to explore MyPaint. GIMP uses some MyPaint brushes, but MyPaint is also a program in its own right that IS intended for drawing and painting.
https://mypaint.app/
Hope that helps!
Serkan
This page helped my elementary Gimp drawing skills a lot. Keep up the good work!
Thomas Boldt
Thanks, Serkan! Hope you’re having fun with it =)