
Before you can start learning the ins and outs of GIMP’s powerful image editing tools, you’ll need to install it on your computer – no surprises there. Installing GIMP on Windows 10 is pretty easy, but there are a few options for Mac users. In this tutorial, you’ll find a way to install GIMP for both Mac and Windows.
The most important thing to remember is that you should always download your copy of GIMP from the official website at gimp.org, the home of the GNU Image Manipulation Program in all its open-source glory.
(Yes, that’s really what GIMP stands for, but GNU like the free software project, not the horned savannah antelope.)
Quick Navigation
Installing GIMP on Windows 10
Installing GIMP on Windows 10 is a pretty straightforward process, but let’s break it down to make sure your installation goes smoothly.
Start by downloading the latest copy of GIMP from the official website here. The site should correctly detect your operating system and offer you the choice to download the GIMP installer directly or use BitTorrent. The direct method is simplest, and there’s a list of mirrors worldwide.
Open the installer from your browser or find the file in your Downloads folder and run it. Depending on your system setup, you might see a warning at this point from Microsoft recommending you install apps from the Microsoft Store only, but click Install Anyway.
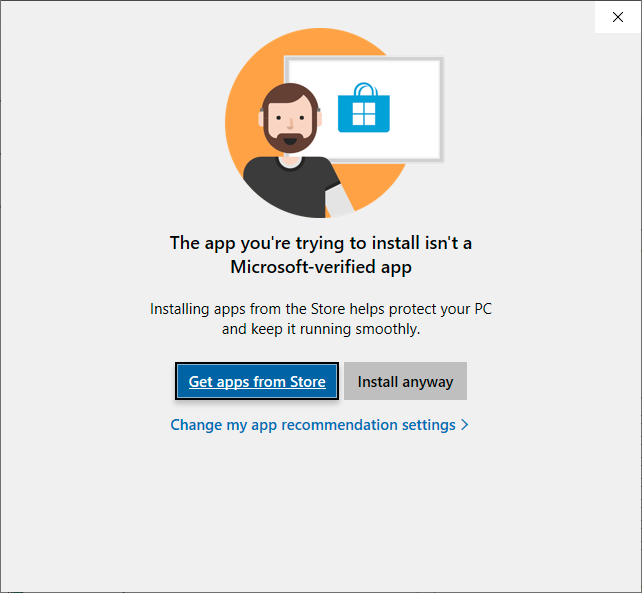
You can also disable the app recommendation warning in the settings later if you want, but I find that it’s useful to have an extra check on the installation process just to be certain. I’d recommend you avoid the versions of GIMP on the Microsoft Store, but I’ll explain why later on once we’re done.
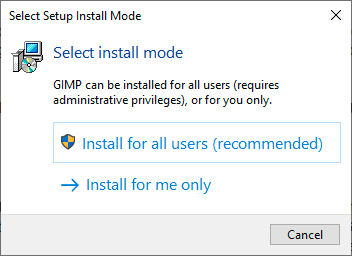
Next, you’ll need to decide if you want to install GIMP for everyone with an account on the computer or just for your own account. It’s generally simpler to install GIMP for everyone unless you don’t have admin permissions. Installs can sometimes go wonky when it’s just one account!
(That’s the technical term, “wonky”. It’s not usually an issue, but sometimes complex permission or file structure issues can appear in non-standard installs when you try to use poorly-coded plugins or add-ons that aren’t expecting custom setups.)
If you choose to install for all users, the User Account Control dialog will appear, asking if you want to allow the app to change your device – in other words, to install itself. I think you can figure out if you should click Yes or No. (It’s Yes. Click Yes.)
Select your installation language, and you reach the truly… unique… GIMP installation splash screen, featured below. I would love to have been a fly on the wall during the discussion that selected this particular splash screen, wouldn’t you?
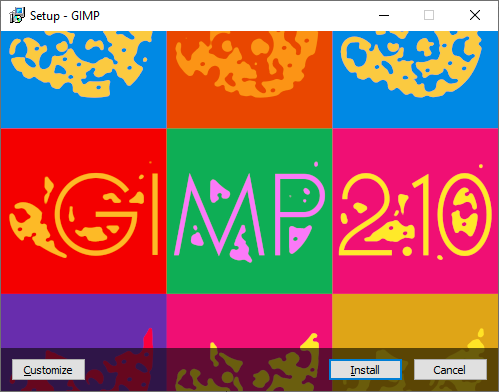
If you just want to get things going as quickly as possible, click the Install button, and the setup program will handle everything else. GIMP will install automatically with all the default settings and resources that you’ll see in my screenshots, and you can get started on other tutorials!
You can also choose Customize, which also starts the installation process but you get to read the entire GNU General Public License (GPL) first. You can also customize your install directory and what components to include, but GIMP is pretty lightweight even when you opt for everything.

Support for 32-bit plug-ins takes up a surprising amount of space, but it’s worth including since you never know when you might need it, and it’s not all that large in the grand scheme of things. If you really need to shave things down, I’d give up Translations before skipping 32-bit support.

One last overview of the setup configuration you’ve selected, and click the Install button to get the ball rolling.

Sit back, relax, and learn about the wildebeest, also known as a gnu, while GIMP installs
That’s all you need to do to install GIMP on Windows 10! Once the installation is complete and you click Finish, you can launch GIMP from the Start menu or the desktop shortcut, if you created one during the setup process. It’s time to explore what GIMP can do for your images!

A Note About Microsoft Store
There are quite a few versions of GIMP available for download on the Microsoft Store, and some of them even cost money. Technically, they are bundled in with additional plugins and UI themes, but you can usually get these for free if you take the time to download them for yourself.
There’s a good reason the official installer includes the message “Remember: GIMP is Free Software.” Many unscrupulous people repackage open-source software and resell it to unsuspecting users who don’t realize that they don’t need to pay for it.
While Microsoft has some developer accountability and threat prevention for apps on its digital storefront, it’s best to download the latest version of GIMP for free from the official website to make sure you can trust exactly what you’re getting. Basic digital security is worth your time!
Installing GIMP on macOS
Installing GIMP on macOS is just as simple as it is on Windows 10. GIMP 2.10 is compatible with all versions of macOS from 10.9 Mavericks onwards (released 2013), so hopefully, you don’t need to worry about what you’re running. Older GIMP versions are available if needed.
Download the latest version of GIMP from the official downloads page here. The site should detect that you’re on a Mac and provide a direct link and BitTorrent file, but the direct link is reliable and generally faster than messing around with BitTorrent (unless you already know how).
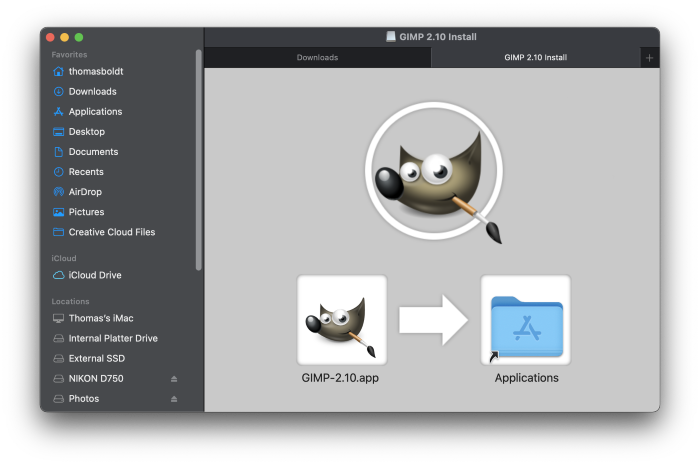
Open the installer file from your browser or Downloads folder, and drag the GIMP icon onto your Applications folder. You’ve just installed GIMP on macOS – that’s all there is to it! You can find GIMP in your Applications folder or create a shortcut on your dock.
Installing GIMP on Your Mac with MacPorts or HomeBrew
As of this writing, the GIMP.org download page lists both MacPorts and HomeBrew as having the latest version of GIMP available for installation, but you might want to double-check that they have continued to keep pace with later official releases before you rely on this method.
If normal application installs are boring to you, or you really just think terminal windows are cool because you also watched too many bad 80s hacker movies you’re a nerd like me, you can set up MacPorts or HomeBrew on your Mac to let you install apps with a Unix-style command line.
I don’t have room to go through the full setup process for MacPorts and HomeBrew here, but you can check out the MacPorts install guide here and the HomeBrew guide here. Once you’ve got them set up, the following commands will install GIMP on your Mac:
- MacPorts: sudo port install gimp
- HomeBrew: brew tap homebrew/cask && brew install – cask gimp
MacPorts seems much simpler to me (and entirely Unix-like), but you should indulge your command line self in any way that works for you!
Installing Previous GIMP Versions
If you’ve run into a compatibility issue and you need to install a previous version of GIMP, you can also find them on gimp.org, although you’ll need to be comfortable navigating a directory structure and parsing out which version number you’re getting from the filenames.
Remember that plugin compatibility might be a problem when running old versions, although it’s also possible that might be the very reason you need an old version in the first place.
Conclusion
No matter what version of GIMP you end up choosing, you know everything you need to install GIMP on Windows 10 and Mac – and with a sweet command-line option thrown in for good measure. Be sure to check out my other GIMP ‘how to’ guides to figure out what to do next!
About Thomas Boldt
Jean
Hello Again,
While I didn’t find this information after an internet search, I searched your site and discovered that dpi is actually the same as pixels Ughhh…that would have saved a few more hours.
Thanks Again!
Thomas Boldt
Hi Jean, sorry I didn’t get to your first comment in time to save you the hassle, but I’m glad it was still TGT that was able to help in the end =) Cheers!
Jean
I spent an entire night trying to install BIMP, no matter what I did it wouldn’t work. I uninstalled GIMP and reinstalled it following your directions. It all worked perfectly! For a few days…
But now I think I messed up something- but I’ve seen other comments about this problem posted but no one seems to have found a solution. When I try to scale and image, the X/Y pop-up will no longer give me an option of selecting dpi.
Any ideas?
Thanks!
Dale Mead
Gimp app won’t drag to applications file. Crossed out. Please advise.
Thomas Boldt
Hi Dale, what version of macOS are you using? The latest version of GIMP is only compatible with macOS 10.12 Sierra or newer. If that’s not the problem, then I’m not sure what the issue could be…
Can you install other apps without any issues?