Layers are a key part of any complex editing project, and getting comfortable working with them and moving them around is a great step on your GIMP learning path. GIMP’s layer handling isn’t perfect, but it’s easy enough to move a single layer around, or even several layers at once.
A Quick Guide to the GIMP Move Tool
As you might expect, the easiest way to move a layer or image in GIMP is using the Move tool. You can find it at the very top of the toolbox, or switch to it using the helpfully obvious and easy-to-remember keyboard shortcut M.

There is one essential thing about the Move tool that’s not immediately obvious, though. Sharp-eyed readers will note the Tool Options panel in the bottom left of the screenshot above, and see that there are actually a couple of different options available.
By default, the Move tool is set to Move selection, which means you could try dragging your layers around all day and still never nudge them by a single pixel. You’ll need to switch the Move tool into Move layers mode by clicking the small layers icon (see below).
Remember that the yellow and black layer border that GIMP has enabled by default isn’t a selection border, it just looks like one – so don’t waste your time trying to use the Move selection mode 😉

It’s also possible to allow GIMP to choose which layer you want to move, but I don’t recommend this unless your layer objects are very clearly separated.
Moving Multiple Layers in GIMP
As I mentioned earlier, GIMP’s layer handling could use a bit of improvement, but it’s still possible to move multiple layers at once. It’s actually one of the few edits that GIMP lets you perform on multiple layers at once, but many of us are hoping that the upcoming new version of GIMP will revamp the whole layer system.
In the meantime, you can link multiple layers together using the Layers panel, which is found in the bottom right corner of the interface by default.
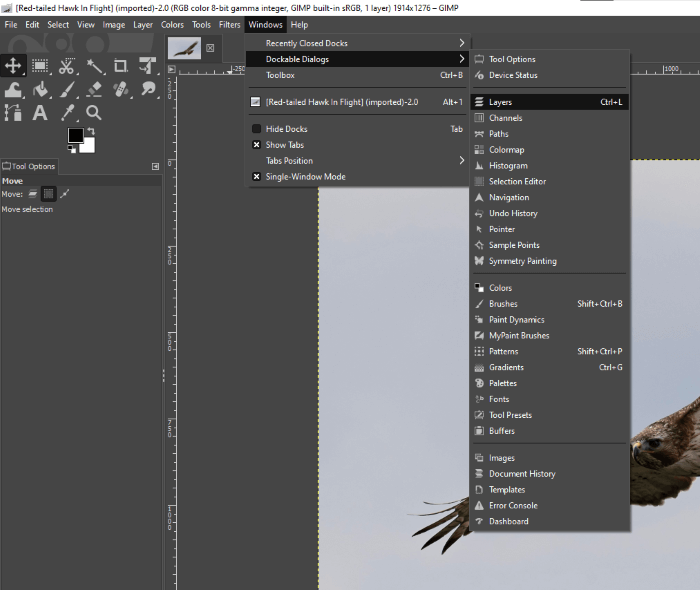
If your Layers panel isn’t visible, you can reload it by opening the Windows menu, selecting Dockable Dialogs, and clicking Layers. You can also use the shortcut Ctrl + L (or use Command + L if you’re running GIMP on a Mac.)

When you need to link any of your layers together, simply click the open space to the right of the eye icon which indicates layer visibility. A small chain link icon will appear in the space, indicating that the layers are linked, as you can see in the sample screenshot below.

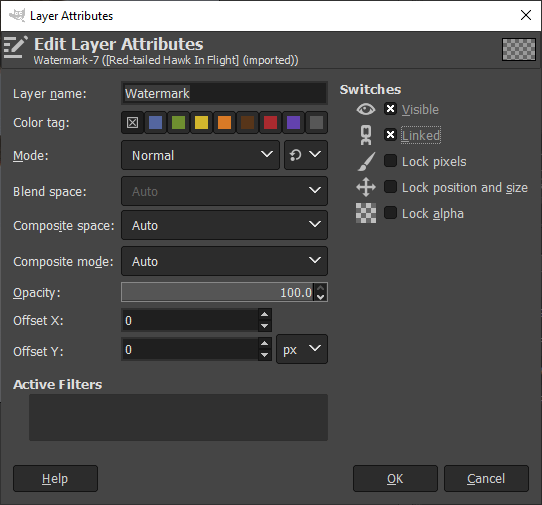
You can also link layers by accessing the Layer Attributes dialog window, although this method is much slower if the only change you’re making to the layer is about linking. Double-click on the layer thumbnail in the Layers panel, or right-click on the layer and choose Edit Layer Attributes.

Once your layers are linked, they’ll all move like a single object when you use the Move tool on them – just remember to have Move layers selected in the Tool Options panel!
Precision Movements
If you need a more precise method of moving your layers than the Move tool, there are a couple of ways that you can achieve it. The Layer Attributes panel shown above allows you to set the Offset X and Offset Y parameters for the layer, which is offset by the specified number of pixels.
Negative values can allow you to offset your layers beyond the upper and left edges of the canvas, but you can only move a single layer using this trick so it’s not always helpful.

The other option is to use the Unified Transform tool, although you don’t actually get many advantages from this other than the helpful Transform Matrix window which tells you just how much you’ve adjusted your layer content – just be careful not to accidentally stretch it out of proper aspect ratio!
With that last caution in mind, you know just about everything there is to know about how to move layers in GIMP. It’s a very handy skill for all kinds of design and image editing tasks, so be sure to practice until it’s second nature!
About Thomas Boldt
Arlis
I was just getting used to the last version of Gimp I had. The most basic thing I do with GIMP is take two images and put them together, flatten them, and export them. if I wanted to move an image, I just selected the move tool and moved it. In this latest update I select the move tool, but when I try to move the image there is a checkerboard underneath that stays in place, and the image disappears under its edge. What is that, and how do I get it to move with the image so I can bring in another image? Newby question, I know, but now the most simple and basic thing I used to do is a mystery, and I don’t even know the terminology to figure it out in ‘help’.
Thanks
Jae
I feel your pain. That is why I’m here as well. It seems like using the “move the selection” tool used to move the selection. Now I have to discover whatever arcane art will allow me to just drag my picture where I want. Did you learn how to do it?
Jae
Actually… I have a system worked out now. This article helped set me on the right track. It made me aware that the yellow line didn’t mean my area was selected. Now I can drag my images where I want them.
anon
oh wow. this is so helpful because to this day i have been moving them by trying to guess the correct x and y values. i just thought that this is yet another of those basic things that they decided to not add support for
robin broughton
Hi,
Thanks for your article and useful content. Do you know of a way to click an object to see which layer it is then jump straight to it. I’m sure it is quite simple but I have failed to discover it as yet.
sincere thanks
R Broughton
Thomas Boldt
Glad you found the post helpful! There is a way to do what you’re looking for using the Move tool.
With the Move tool active, if you look in the Tool Options panel, you’ll see two settings: ‘Pick a layer or guide’ or ‘Move active layer’. If you select ‘Pick a layer or guide’, you can click on individual image elements in the main image window and GIMP will attempt to automatically select the layer they’re associated with. It will put an outline around the selected layer border, and temporarily highlight the layer in the Layers panel.
As long as you’re still holding down the mouse button, you can drag that layer around, but once you let go, GIMP will return to your previously selected layer. I don’t use it much myself, but that’s because I learned these tools before they added fancy automatic selections like that, and old habits die hard, lol!
Hope that helps!