Combining multiple images is one of the most common image editing tasks that you’ll run into. It lets you create everything from photorealistic composites to surrealist art – or even memes if that’s more your thing.
The basic process is quite easy, although it can take a lot of practice to make your composites look seamless (assuming you care about that).
The basic principle is an aptly named concept: layers. Layers allow you to combine multiple images into one by treating different image elements as separate objects within the same image file. Each image is simply layered on top of the next one within the same space.
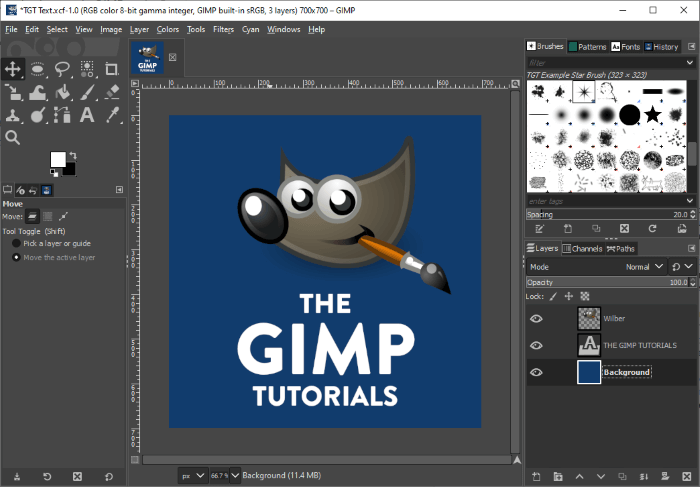
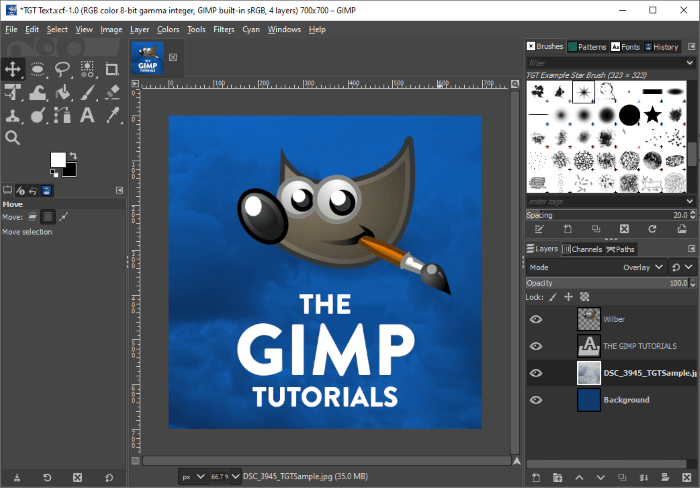
Imagine this image as a big stack of transparent plastic sheets. Each sheet or layer has a different part of this sample text image on it: one layer has the Wilber image element, one layer has the white TGT text, and the final layer contains the blue background. When the stack of layers is combined together, get the final image you see above.

To overlay images in GIMP, you just need to open multiple images as separate layers and then modify them until you’re happy with how they fit together. Sound simple? It is – although it’s one of those things that’s very easy to do badly and very difficult to do well.
There are whole groups dedicated to poorly edited memes, though, so there’s never been a better time to start learning how to overlay images in GIMP!
Quick Navigation
The Quick Guide to Overlaying Images in GIMP
The basic process is very simple – here’s how it works.
- Step 1: Open your background image or create a new file.
- Step 2: Open the File menu, and choose Open As Layers.
- Step 3: Browse to select the image you want to overlay on the background and click Open.
You’re done! You can repeat steps 2 and 3 as many times as you want until you’ve overlaid all your images, although keep in mind that the more layers you have open, the more RAM (random access memory) you’ll need for GIMP to continue running smoothly.
If you’re excited to get started on your project, that might be enough information for you, but if you want to learn more about the process as well as a few tips and tricks you can use to make your overlays more effective, read on!
Tips and Tricks For Better Overlays
Usually, in these tutorials, I do a quick version for users who are already comfortable with GIMP and a more detailed version for newer users, but this time I’m going to do things a bit differently. Most of the steps in the process of overlaying images are very simple and don’t need a whole lot of explanation anyway.
Instead, here are a few handy tips that will help you create better overlays with more seamless transitions between the individual layers – as well as a few cool overlay effects that you might not be aware of. Let’s get started!
Make Your Own Copypasta At Home
While you can definitely use the Open As Layers method to add new images to your GIMP file, it’s not always the fastest way of doing it. You can also simply copy images into the clipboard from your web browser and certain other programs and then just paste them directly into GIMP.
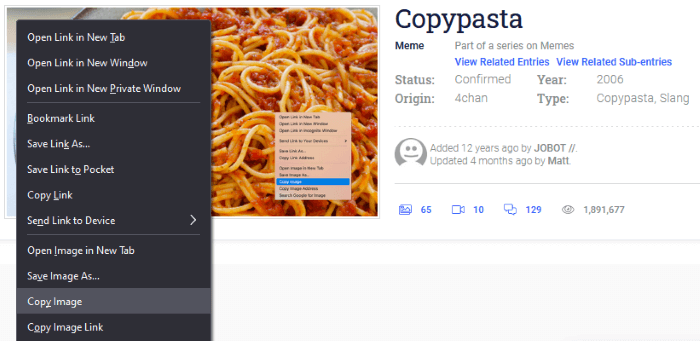
This method means you don’t have to save the file from the web and then find it again using the Open As Layers command, which can seem a bit tedious when you’re on fire with creativity.
In your web browser, right-click on the image, select Copy Image to store it temporarily in your clipboard (it might have a slightly different name depending on what browser you’re using), and then switch back to GIMP.
Press Ctrl + V (or Command + V on a Mac) to paste the image from your clipboard directly into GIMP. GIMP turns it into something called a Floating Selection, but you just click the green New Layer button in the Layers panel and GIMP converts the Floating Selection into a new layer.
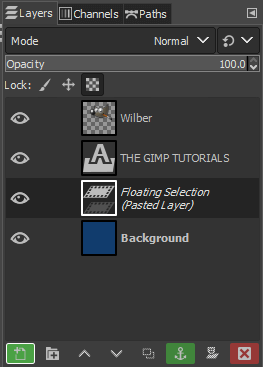
You can also use the anchor to (you guessed it) anchor your floating selection, but that compresses it into the layer below and you can no longer move them separately. You have to either turn your floating selection into a new layer or anchor it before you can continue working on the rest of your image.
Tweak the Layer Order
Layer stack order is a key part of using the layer system. The top layer in the Layers panel will show up over top of all the other layers, descending in order until you reach the bottom layer in the list, which acts as the background layer behind everything else.
Once you’ve got a bunch of different layers in your file, you might decide that you want them to be in a different order. You can drag and drop the layers using the thumbnails to rearrange them, or you can use the arrow buttons at the bottom of the Layers panel.
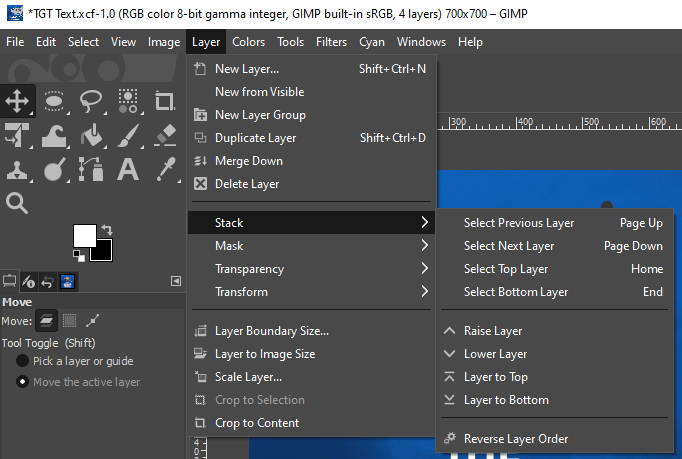
You can also modify the layer stack order by opening the Layer menu, selecting the Stack submenu, and choosing whichever option you need, although I prefer to use the drag and drop method.
Use Layer Masks For Clean Edges
Once you’ve added a bunch of images, you probably want to modify them a bit so that they fit together the way you originally envisioned. You could use the Eraser tool to delete the parts of each layer that you don’t want, but what happens if you change your mind later?
If you’ve erased the pixels, they’re gone for good and you have to add the image as a new layer again to get them back. But if you use a feature called layer masking, you can tell GIMP to hide certain parts of a layer without actually deleting them.
The whole process of perfect masking can actually be a bit complicated, but the basics are simple enough. A layer mask is an invisible black and white guide that sits overtop of your layer and tells GIMP what’s visible and what isn’t: white pixels are 100% opaque, and black pixels are 100% transparent, while grey tones give you partial transparency.
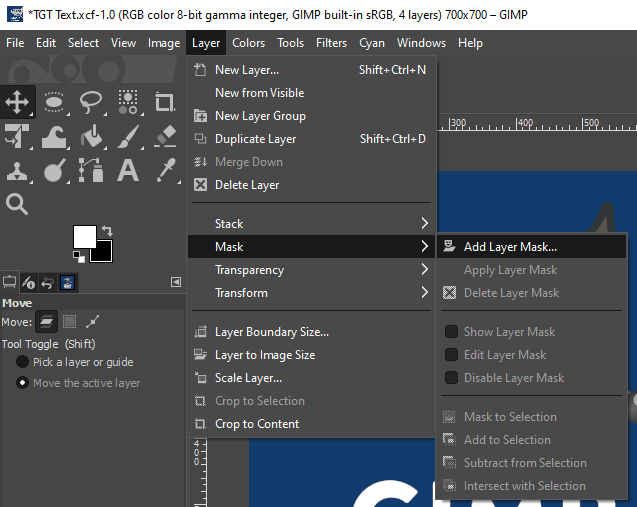
Start by selecting the layer you want to tweak in the Layers panel. Open the Layer menu, select the Mask submenu, and choose Add Layer Mask. You can also right-click on the layer in the Layers panel and choose Add Layer Mask from the popup menu.
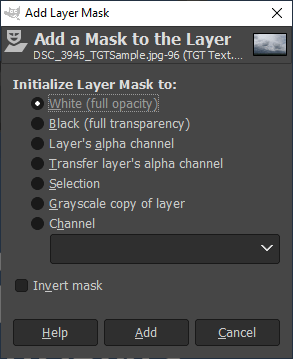
Usually, you’ll want the mask to be either white or black to start, but feel free to experiment with the options. Once you’ve got it added, a new thumbnail appears in the Layers panel. Click the new thumbnail to select the mask, and then paint with white or black pixels over your layer to control what parts are visible.
But Will It Blend?
If you somehow missed the whole “Will It Blend” thing, don’t worry about it, I’ve just got virals in the brain today. For GIMP overlays, there’s a whole lot you can do with blending, but we use blending modes that change how overlaid images are combined instead of viral marketing for kitchen gadgets (shocking, I know).
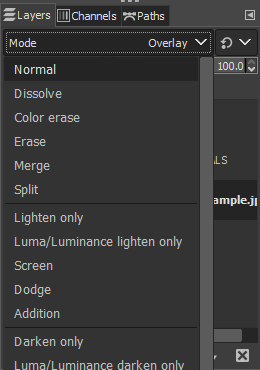
If you take a close look at the Layers panel, you’ll see the Mode dropdown just below the title of the panel. By default, it’s set to Normal, but there is a huge list of different ways that you can combine your overlaid images to create some wildly different results.
In the TGT example file, I’ve added a new photo of some oncoming storm clouds. The storm cloud image is over top of the blue background, but below the Wilber image and the text. With the Normal blend mode, everything looks like you’d expect, and the blue background is totally hidden.
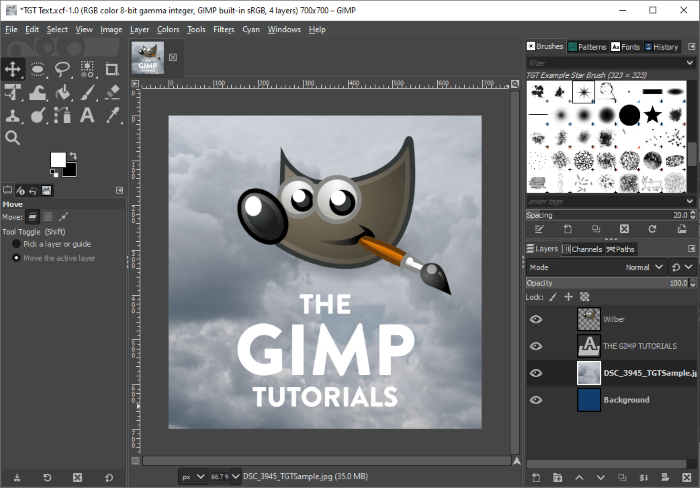
But if I change the blend mode to Overlay, the clouds take on some of the blue colors from the background layer that’s beneath the cloud layer, as you can see in the image below.
There are way too many different blending modes to discuss them all in this article, and they might even need a multi-part post in order to cover them all. They’re a lot of fun to experiment with, and you’ll get some very unexpected results until you learn the basics of how each mode works.
A Final Word
This is just barely scratching the surface of how to overlay images in GIMP, but I hope you’ve got a good grounding in the basics of how it all works now. Masking and blend modes are extremely complicated, but also very worth taking the time to get right.
Overlaying images will come up over and over again in the world of digital images, so be sure to practice every chance you get!
About Thomas Boldt
Dave
Hi Thomas, I tried multiple shots of a coin, each being focused on a slightly different (linear) spot, which I then opened as an overlay, however I don’t understand how to view the finished product (showing the coin in complete focus) and I can’t seem to find out how to save that image.
Thomas Boldt
Hi Dave, the technique you want to use is known as ‘focus stacking,’ but I’m not sure I’d recommend doing it by hand unless you really, *really* need to – it can be very tedious! The techniques that I have described in this post are better used for combining just a couple of images rather than the precise kind of blending that is required to create a smooth focus stack from lots of different images.
Unfortunately, that means that GIMP isn’t really a good choice for this project. Some people say that you can use the G’MIC plugin to do focus stacking, but I haven’t tried using it for that myself, so I can’t verify that it works. This link might be of some help:
https://www.reddit.com/r/GIMP/comments/zycopb/auto_focusstacking_in_gimp/
Gregory Corning
Your writing is clear and concise. Thank you for creating this tutorial.
Thomas Boldt
You’re welcome, Gregory! Glad you’re finding the site useful.
Jennifer Lee Donnell
i have a simple photo of my sheep…i want craft a simple greeting card with twinkles (already downloaded) and hours into this the twinkles are few and too large so trying to shrink that layer and stuck…
Thomas Boldt
Hi Jennifer, homemade greeting cards are always a great idea! If you’ve got the ‘twinkles’ added to the sheep photo on a separate layer, you can reduce the ‘twinkle’ size using the Scale tool. Select the ‘twinkle’ layer in the Layers panel and press Shift + S. You can also duplicate the ‘twinkle’ layer to add more of them, and scale them all to different sizes and place them at different points around the photo. Does that help at all?