Watermarks are a useful tool for any digital artist who wants to share their work online. They help you to build a name for yourself, draw your entire body of work together, and help ensure that you get proper credit for each part of it.

Think long and hard about why you want to remove a watermark from an image before you do so – you might be unintentionally hurting the artist who created the image. Depending on who owns the original image, your intentions, what you do with the edited image, and where you live, you might also get into legal trouble.
Proceed at your own risk!
I almost didn’t end up writing this article because of all the legal and ethical complications, but there are enough situations where it could be helpful (and perfectly legal/moral) to justify a good explanation. It may even help you design more effective watermarks to protect your own work.
Many older photos were automatically watermarked with the time and date, and you might even find yourself in a situation where you need to remove a watermark that you added to your own image. Losing your original source files can be painful!
It’s even possible that you just want to remove a watermark placed automatically by an image sharing service used by meme-makers such as Imgur or 9gag, although that may already be starting to reach a legal grey area.
Then again, the whole world of memes is a grey area, and I’m not a lawyer, nor do I play one on the internet.
Whatever your reasons for removing a watermark, there are three basic methods that you can use in GIMP: use cropping, use clone stamping, or use a third-party plugin to cover it up automatically.
Quick Navigation
Method 1: Cropping
Watermarks are often placed in the corners of images so they don’t interfere with the rest of the picture, as with the time and date stamps added by older disposable cameras (or by many well-meaning and/or inattentive digital photographers).
Take a good look at the image you’re working on, and determine if cropping will cause you to lose any important image data.
If not, you’re in luck – cropping is the fastest way to remove a watermark in GIMP. This method is definitely far more brutal than the others, and it won’t work for every situation, but it’s also the simplest way. Here’s how to use it:
Open your watermarked image in GIMP, and switch to the Crop tool using the toolbox or the keyboard shortcut Shift + C.

Click and drag to define your crop area, aligning the edges to trim off the watermark while leaving the rest of the image intact.
Once you’re happy with the final result, press Enter to finalize your crop.
Keep in mind that many photos benefit visually from the standard 3:2 aspect ratio used by all major camera manufacturers, and cropping an image like this can throw things off, depending on where you place your crop area.
Sometimes it’s better to crop a bit of additional image area from one side, even if it’s not watermarked, to maintain the same aspect ratio – but you’ll have to use your own judgment about the right crop area for each image.
Method 2: Clone and Heal
Using the Clone Stamp and Healing tools to remove a watermark is the most time-consuming and painstaking method, but it will also produce the best results. If you care about removing a watermark so completely that nobody can tell it was there, this is your best approach.
Choosing between the Clone Stamp tool and the Healing tool can be difficult sometimes, and the right choice often depends on the image content that you’re working with.
The Clone Stamp tool usually provides the best-looking edit, but the Healing tool can recreate textures very effectively – and it can even save you a huge amount of time when working with smooth backgrounds.
Sometimes you’ll even need to use some combination of the two in order to get the perfect result. Thanks to the Undo command, experimenting is always easy!
Fortunately, the settings and processes for the Clone Stamp tool also work with the Healing tool, you’ll just get a slightly different result. Here’s how to use them to remove a watermark in GIMP:
Step 1: Create A New Layer
The best way to handle cloning and healing is to apply all your edits to a new layer, or even to multiple new layers in larger projects. This gives you the ultimate flexibility later on if you need to adjust your edits, and you won’t have to start from scratch if something goes wrong.
Many beginner image editors skip this step when they’re still learning, but it’s a good habit that you should form as early as possible!

Create a new layer in your image using the keyboard shortcut Ctrl + Shift + N (use Command + Shift + N if you’re using GIMP on a Mac). You can also use the New Layer button at the bottom of the Layers panel, or open the Layer menu and click New Layer.

In the New Layer dialog box, make sure to give your layer a descriptive name, and set the Fill with option to Transparency. Click the OK button.
In the Layers panel in the bottom right corner of the GIMP window, select your new layer.
Switch to the Clone Stamp tool by pressing the shortcut C or switch to the Healing tool with the shortcut H.
At the bottom of the Tool Options panel, make sure that the Sample merged option is enabled in the Source section. This tells GIMP to sample all the visible layers in your image when cloning. Without this enabled, you would just clone the empty pixels from your new layer and nothing would happen.

Both tools also require you to set a source point before you can start using them since they need to know which pixels they should be cloning/healing from. Hold down the Ctrl (or Command on a Mac) and click at an appropriate point in your image to set the source.
Then you simply “paint” using the brush the way you would with any other brush-based tool in GIMP. You can adjust brush size, brush edge hardness, and opacity to create the effects you need.

After a few false starts and a lot of use of the Undo command (use Ctrl + Z or Command + Z for the fastest results), you’ll eventually be able to hide the watermark entirely.
Method 3: Automatic Removal
This last method for removing a watermark in GIMP is almost faster and easier than cropping, as long as you’ve already got the right plugin installed. While more advanced programs like Photoshop have had automatic removal tools for some time, GIMP is a bit out of date thanks to its slower release cycle. Plugins to the rescue!
The best option that I’ve found is the popular plugin Resynthesizer, which comes with a huge range of advanced tools and filters that aren’t included in GIMP by default.
If you don’t have Resynthesizer installed, check out my list of the best GIMP plugins to learn how to download and install it. It’s entirely free and definitely worth having just for the one feature I’m about to explain: content-aware fill.
Content-aware fill can seem almost magical the first time you use it, especially if you’ve tried clone stamping by hand. It uses all kinds of complex math I don’t understand (and you don’t need to either) to automatically fill in a selection area based on the surrounding image data.
It’s not always perfect, but even when it’s a bit off, it can create a useful starting point for polishing up by hand using the Clone Stamp tool. This can save you a lot of time and effort!
Once you’ve got Resynthesizer installed, it’s a very simple process with only a couple of steps.
Step 1: Make Your Selection
Using your choice of selection tool, create a selection around the watermark you want to remove. I’d recommend using the Free Select tool or the Scissors Select tool, but the best choice will depend on the exact content of your image.

If your watermark is just a string of text or numbers, a basic rectangular selection should be enough. Don’t worry about trying to create a perfect selection around each letterform, as you’ll just drive yourself crazy needlessly.
Having fewer edges in your selection area means there will be fewer areas that might catch your eye as ‘not quite right’, usually creating a better final result.
Step 2: Resynthesize!
One of the great virtues of this filter is how simple it is to use.

Open the Filters menu, select the Enhance submenu, and choose Heal selection.

Adjust how much of the image should be used for sampling, the sample locations, and then choose your fill order. You’ll have to experiment with the settings to find out what works best for your image, but they’re fairly self-explanatory.
Click OK, and the plugin will start processing. It can take some time, but you’ll get a progress bar in the dialog window.

Assuming all went well, you’re done!
Of course, while Heal selection is a useful feature, it isn’t a magical cure-all for watermark removal. If you use it on an image area that’s too large, you’ll get some very weird results.
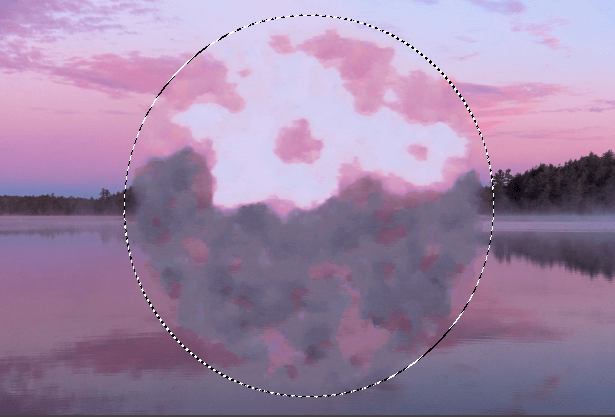
For example, if I use it on the “For Editorial Use Only” watermark from the beginning of this tutorial, this is the result:

It did a pretty good job of blending in with parts of the sky and the water at the top and bottom of the selection, especially considering that all I did was click the OK button and wait around, but obviously, it wouldn’t actually fool anyone into thinking it was the original image.
A Final Word
Those are the three most effective ways to remove a watermark in GIMP, and they each have their own strengths and weaknesses. You’ll have to decide which is the best one to use for your particular project, although ideally, you’ll never have to use them at all.
Remember, watermarks help artists get proper credit for their work, which in turn helps them to build a name for themselves. I know that’s not the only type of watermark, but it’s important to repeat it, just in case.
Make sure that you use your newfound powers for good and not for evil!
About Thomas Boldt
Scot Lopez
Thanks for sharing your thoughts with us on how to remove watermark, Keep up the good writing.
Abhi
Thank you sooooo much, this worked out perfectlyyyyy!
Maria Johnson
I tried method 2 and followed your instructions to the letter, but it didn’t work. I had to copy and paste the watermarked area into the new layer before it would work.
Thomas Boldt
Hi Maria, sorry to hear that you had trouble! Did you remember to make sure the ‘Sample merged’ option was checked in the Tool Options panel? It’s also important to remember to set the cloning source point on the original layer – but then once you’ve set the source point, you have to switch to the new layer to do the actual painting with the Clone tool.
I hope that helps!