Sharpening can be the difference between a good photo and a great one, making it an essential step in any photo editing workflow. GIMP only has a couple of sharpening options, but it’s important to use them properly to get perfect tack-sharp images that don’t look overprocessed.
There are two primary ways to sharpen an image in GIMP, and they’re both easy to use. You can sharpen exclusively in selected areas using a brush-based tool, or you can sharpen the entire image at once with a filter.
Method 1: Select the Sharpen tool from the toolbox and hand-paint the areas to be sharpened.
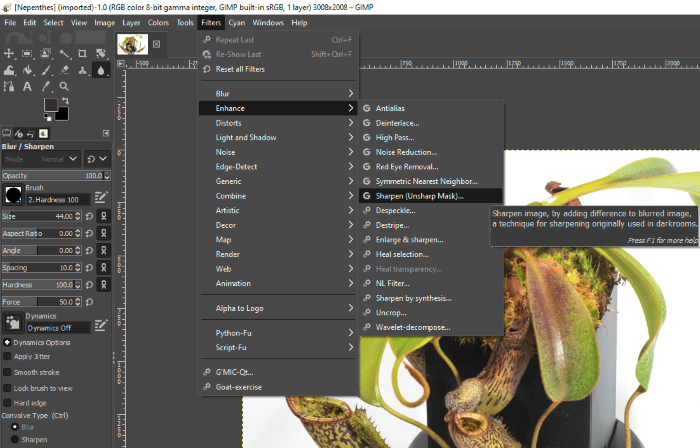
Method 2: Open the Filters menu, select the Enhance submenu, and click Sharpen (Unsharp Mask).
While sharpening is easy to apply, it’s even easier to apply far too much of it. You’ve probably seen wildly oversharpened images online without realizing why they looked so bad, but a little attention to detail (and this guide) will make sure that never happens to any of your images.
Let’s take a closer look at these two methods for sharpening an image in GIMP, learn how they work, and where they fit best into your workflow. Read on for more sharpening tips!
Quick Navigation
Method 1: The Sharpen Tool in GIMP
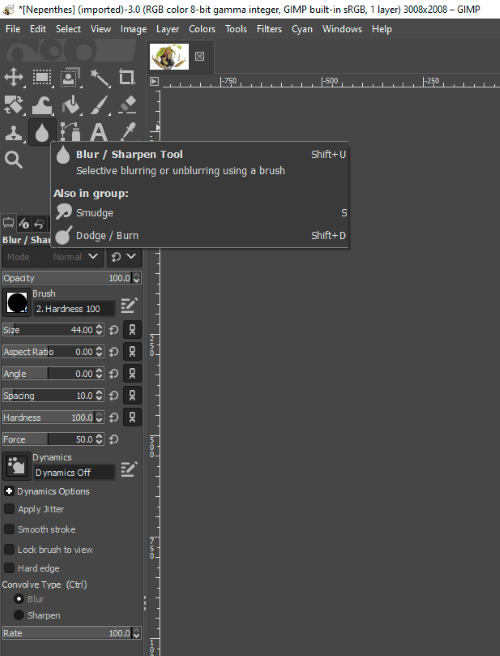
Using the Sharpen tool is just as easy as using any of GIMP’s brush-based tools, although it’s not immediately obvious where to find it in the toolbox. Blur and Sharpen are two sides of the same coin, and GIMP bundles the two together under the teardrop icon in the toolbox.

There are also two other tools bundled into this spot in the toolbox by default (though I’m not sure why, exactly), so if you can’t find the Blur tool and Sharpen tool in GIMP, it may be behind the Smudge or Dodge / Burn icons instead. Using the shortcut Shift + U is always a faster way to start sharpening.
Like all brush-based tools in GIMP, there are a number of options that can affect how the sharpening is applied from Opacity to Force, but Rate is the most important. If you’re going to use the Sharpen tool, use a mid-range Rate setting and gradually build up the effect as needed.
The Sharpen tool gives you the ultimate degree of control over how sharpening is applied to your image, but that great power comes with great responsibility a few downsides that limit its usefulness.
Every click restarts the sharpening effect, so you often have to work in very long strokes that limit your undo options. Additionally, there’s no mask or guide that shows you exactly where you’ve already applied the tool, so you can wind up with very inconsistent results if you’re not careful.
When to Use The Sharpen Tool
Because of these issues, the Sharpen tool works best when you use it with a light touch. If you want to sharpen your model’s eyelashes a bit or you want the bumblebee’s fuzz in your macro shot to really pop from the background, the Sharpen tool works well – but not for much more.
If you find yourself using the brush over more than just a small section of your image, you’re probably better off applying a Sharpen filter to the entire image – so let’s take a look at how that works.
Method 2: Sharpening an Image with a GIMP Filter
If you were having trouble finding the right Sharpen filter to use on the whole image, you’re not alone. You can find the correct tool by opening the Filters menu, selecting the Enhance submenu, and then clicking Sharpen (Unsharp Mask). Yes, Unsharp Mask is the right one!

This slightly confusing name dates back to a technique created for darkroom film development, where a blurred positive version of a photograph is used to enhance the negative film copy of the image you’re working on. Somehow.
If that doesn’t make sense to you at all, don’t worry – I don’t understand exactly how it works either. The good news is that you don’t have to understand why it works in order to use it effectively (though you can read about unsharp masking if you’re curious.)
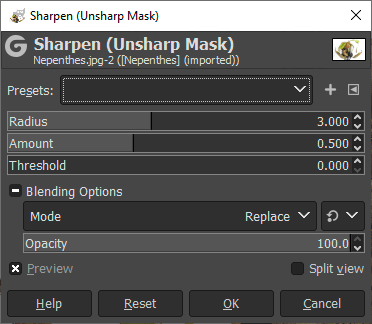
The Sharpen filter uses a digital version of the unsharp masking technique, so extra credit if you have a basic understanding of unsharp masking. However, you only need to focus on 3 settings to control your sharpening result: Radius, Amount, and Threshold.

Sharpening works by detecting edge lines in your image – essentially, the separation of different objects – and increasing the relative contrast of the pixels near those edges. Keep that in mind as you think about the three settings and their effects.
1. Radius – pixels within the set radius of any detected edges receive sharpening
2. Amount – how much sharpening is applied to the pixels within the radius
3. Threshold – sets the contrast difference required for GIMP to detect an edge
It’s handy to use the Preview toggle to compare the “before and after” of your sharpening effect, and you can also use the Split view toggle to see half your image ‘before’ and half of it “after”. Split view doesn’t always help, though, depending on the exact content of your image.
When to Use the Sharpen Filter
Knowing when to use the Sharpen filter is the most important part of using it successfully – and I don’t mean knowing if you should use it, because I have yet to see a photo come out of a camera without needing some sharpening.
Sharpening should always be the very last step in your image editing workflow, after all your edits and any final image size adjustments are made, especially size reduction. Otherwise, you’re going to wind up messing with the effect and having to do it all over again.
Many photographers and image editors are extremely… precise (read: obsessive) about how sharpening is applied to their images. As a result, many different plugins exist with different sharpening methods, algorithms, and endless configurable adjustments.
Eagle-eyed readers among you might have noticed in my screenshots that I have a few different sharpening options available, thanks to a few of the GIMP plugins that I have installed.
Resynthesizer and GMIC each have their own sharpening options, and you can learn more about them in the best GIMP plugins post. You don’t need to use them if you’re not curious, though, because the Sharpen filter in GIMP does a great job already!
About Thomas Boldt
calvin noack
i found this very complicated. i already use the unsharp mask function which i have found unsatisfactory because it puts lines around fine detail like letters that looks a bit like cartoon renditions of radioactivity. i tried to follow your instructions, allowing for the name changes in the different iterations of gimp but got lost about the point of the black and white image and could not return to colour.
Thomas Boldt
Hi Calvin, I’m not sure if I understand correctly where you encountered a problem. You don’t need to make your image black and white in order to use the Unsharp Mask tool. I was just explaining that the origins of the term come from the days of darkroom photography. I hope that helps!
Thomas Altfather-Good
I’ve used and liked the traditional GIMP sharpen tool. I find the version 2.9/2.10 sharpen/unsharpen tool tedious. My question is simply how can I best emulate the old tool, in terms of settings? A proper unsharpen mask is overkill, I typically sharpen in a 10-30 range. Thank you – I’m hoping I can learn to live with the new tool – and the dismal grey theme – rather than rebuilding 2.8 from a source tarball (on a Slackware 15 box).
Thomas Boldt
Hi Thomas, I actually don’t think I can help here – I’m not familiar enough with the 2.8 version of the tool to really know how to replicate it (or even to know how different they are). I know that there are older versions of 2.8 available for Windows, perhaps there’s a pre-compiled version of 2.8 for Linux kicking around somewhere too? I took a quick look and couldn’t find anything other than the official repository, but I’m not nearly as familiar with Linux as I am with Win/Mac. Sorry I can’t be more help!