Typically when you’re adjusting image size in GIMP, you want to maintain a consistent aspect ratio across your transform. This scales your image evenly without any distortion, other than the inevitable blurring that occurs whenever you scale a raster image upwards.
But what if you want to get a bit weird with it? The method you should use to stretch your image depends on whether you want to stretch your entire image or just one layer in a composite that you’re working on.

Stretching an Entire Image
There are a couple of different ways you can adjust the width and height of an image in GIMP, but the easiest method is to use the Scale Image command.
Open the Image menu, and select Scale Image.

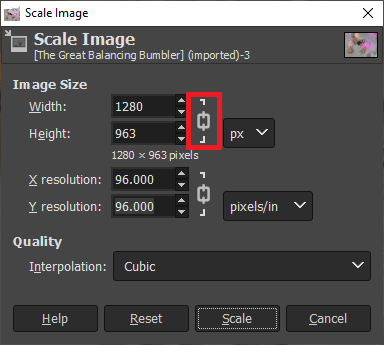
GIMP opens a dialog box containing a few basic options.

The default settings will constrain your adjustments to maintain the existing aspect ratio, which is what people usually want when they’re enlarging or shrinking an image. But if you want to actually stretch your image in GIMP, we’ll need to tweak things a little bit.

It may not be immediately clear, but the icon highlighted above is intended to represent a chain link, indicating that the Width and Height settings are currently linked. If you change the Width setting, the Height setting changes automatically, preserving the current aspect ratio.
It’s also not immediately clear that the chain link icon is also a toggle switch. Simply click the link in the middle and it changes into a broken chain link, allowing you to modify the Width and Height settings independently. This system is a bit of a mess from a usability perspective, but it works well enough once you know the trick.

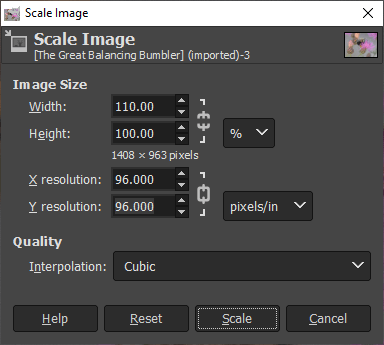
If you don’t want to do pixel calculations, it can be helpful to switch up the units from pixels to percentages. This is a bit more intuitive and may be easier to get a sense of what your final result will be since there isn’t a preview option.

Just make sure that you leave the link between X resolution and Y resolution intact! You’ll get some very weirdly unexpected results if you have a different horizontal resolution than vertical resolution, and you might run into odd compatibility issues depending on your final export format.
Stretching A Single Layer
If you’re working on a composite image and you need to stretch the size of a single layer instead of your whole image, you’ll have to follow a slightly different process. Instead of using the Scale Image command, the Unified Transform tool is your friend.
Switch to the Unified Transform tool using the toolbox, or press the shortcut Shift + T. Click once anywhere on the active layer, and GIMP will add a set of handles to the boundaries of the layer. It can be a bit confusing at first, but it’s a great tool once you learn how each handle works.

To stretch your layer horizontally, hold down the Shift key and click the middle square handle on the right edge of the image, highlighted in yellow in the screenshot above. Drag until you’re satisfied, and then click the Transform button in the Unified Transform overlay dialog box.
If you try doing this without holding the Shift key, you’ll simply scale your layer upwards at the current aspect ratio instead of stretching it.
Those are the simplest ways to stretch an image in GIMP! Just remember that you’ll have to be very careful not to distort your image beyond the realms of reality unless that’s what you’re trying to do. Longcat IS long, after all – but only after a bit of stretching help in an image editor like GIMP.
About Thomas Boldt