It’s almost impossible to scroll your social feeds without seeing a GIF these days. Memes, reactions, and even video clips get posted in almost every comment thread, though most people are stuck using the GIFs provided to them by one of the major GIF sites like GIPHY or Imgur.
But you’ve got GIMP on your side! So with a bit of help from me and the TGT team, you can make your own GIFs of just about anything you want. It’s actually pretty easy, once you know the basic trick: GIMP treats each layer in a GIF image as an individual animation frame!

Quick Navigation
The Quick Guide to Making an Animated GIF in GIMP
Here are the three essential steps for making a GIF in GIMP.
- Step 1: Create a blank new image in GIMP with your chosen dimensions.
- Step 2: Starting at the bottom layer, create each frame of your animation on a new layer.
- Step 3: Export your file in GIF format using the “As Animation” setting in the GIF export options.
That’s it – you’ve just made your first GIF in GIMP! It’s actually amazingly easy when compared with some other programs I’ve tested in the past.
Of course, this is a very simplified version of the process intended for users who are already comfortable working with GIMP and just need a point in the right direction. If you’re new to GIMP or if you want a more complete explanation of how to make a GIF in GIMP, read on!
The Detailed Guide to Making an Animated GIF in GIMP
Even if the general principle is pretty simple, any new project can be a bit confusing the first time you give it a try. Here’s a more detailed explanation of the steps involved in making a GIF in GIMP, along with a few handy tips for streamlining the process a bit.
Step 1: Creating Your Canvas
This is an important question in any image creation process: what size of canvas do you need to work with? Remember that most GIFs are displayed at a fairly small size as part of a post or comment, and usually now on a phone screen which makes the final display size even smaller.
Depending on how long your animation is, large canvas sizes can turn into large file sizes pretty quickly. That’s partly why most GIFs are fairly short – the other primary reason being equally short attention spans. Hey look, a butterfly! *scrolls*
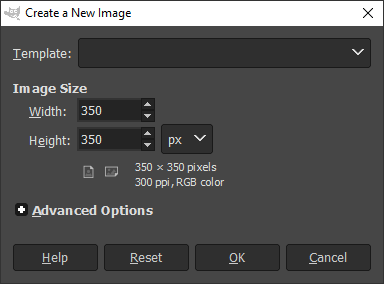
Once you’ve thought about that (including the butterfly), actually creating your new file is easy.
Open the File menu and choose New. Enter the dimensions that you’ve decided, and click OK.
Step 2: Creating the Animation Frames
Animations are made of individual frames shown in order to create the illusion of motion. GIMP uses its existing layer system to allow you to create individual frames, so you probably already know all you need in order to create each frame of your animation.
Each layer will play as a frame in your final exported GIF, starting with the layer at the bottom of the layer stack as frame 1, and then each subsequent layer above is displayed as the next frame in the animation until the top layer in the stack is reached.
There are a lot of different ways that you can handle this process, but I prefer to use layer groups. Here’s an example of how I structured the layers in the super-simple GIF animation used throughout this tutorial:
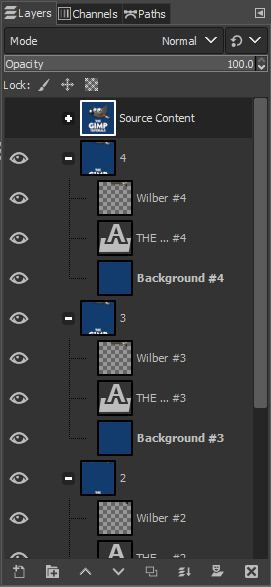
The “Source Content” layer group contains all the original image content on separate layers so I have a backup copy of each one just in case, and each frame is also a layer group containing a copy of the source content layers.
I moved the Wilber layer and the Text layer towards each other just a little bit (in this case, 50px each frame to keep things short and sweet), then duplicated the layer group and moved them a little bit more. Rinse and repeat until you’ve covered all the animation you want to do.
If you use layer groups, remember that they’re only useful for the organization and animation step. You’ll have to merge the layer groups into single layers in order to export your animation, but it’s easy to do. Right-click on the layer group in the Layers panel and choose Merge Layer Group.

You can also select the group, open the Layer menu, and choose Merge Layer Group, but it’s slower when you’re doing 20 different groups. There are third-party plugins that speed this process up, but I haven’t experimented with them so I can’t vouch for how well they work.
This step is where most of the project happens, but there are a few things to keep in mind above and beyond the basics outlined above:
- Keep It Simple
Before you start thinking about making 2000 layers for ultra-smooth motion, remember that most GIFS are usually shorter and lower quality compared to a photo or video clip.
- Keep Track
If you’re going to animate text or other image objects, be sure to keep track of how many pixels you move over each frame. This allows you to create a consistent movement speed, and then to intentionally speed it up or slow it down as necessary – just keep track and be consistent!
- Keep Saving
Last but not least, remember to save your work as an XCF file using the Save command, so that you don’t lose your animation halfway through the process! Animation can take a lot of time and be a bit frustrating (in my experience, at least) so save your work regularly.
Step 3: Exporting Your GIF
We’ll have to do a couple of cleanup steps before we can properly export your animation as a GIF.
First and foremost, we need to ensure that we’re in the Indexed color mode instead of the usual RGB mode. The Indexed color mode means that the file contains a very limited color palette, usually 256 colors or less. It often creates color banding effects across smooth gradients, but it really keeps file sizes down!
To switch to Indexed color mode, simply open the Image menu, select the Mode submenu, and choose Indexed.
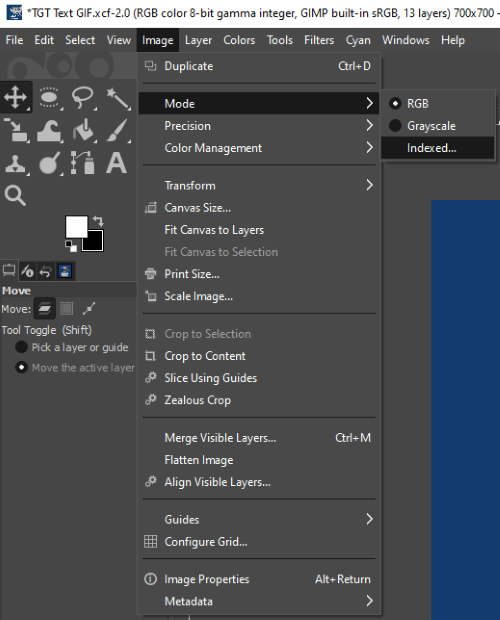
If you can’t select the Indexed option from the Mode submenu, make sure that you’ve flattened any layer groups that you may have used in Step 2 for organizing your layers. This problem has confused more than a few GIMP users since GIMP doesn’t actually tell you that this is why it’s unavailable.
Once you’re able to select the Indexed option, it will open the Indexed Color Conversion dialog – which is actually worth a whole article all by itself. Most of the time, the default settings are fine, so just go ahead and click the Convert button unless you feel like experimenting.

You can always use the Undo command to compare different conversion options if you don’t like the results. Just remember that the more colors you allow into the palette, the larger your file will be – and the better your gradients will look. Compression is always a trade-off with quality when using a lossy format like GIF.
Remember to save your work before exporting, just in case anything goes wrong. You don’t want to lose all that hard work you did on animating during Step 2!
Open the File menu, and choose Export As. Name your file whatever you’d like, and add the .GIF extension to the filename and GIMP will understand that you want to save it as a GIF.
If you’re not familiar with using file extensions, you can use the Select File Type section at the bottom of the Export window instead (shown below).
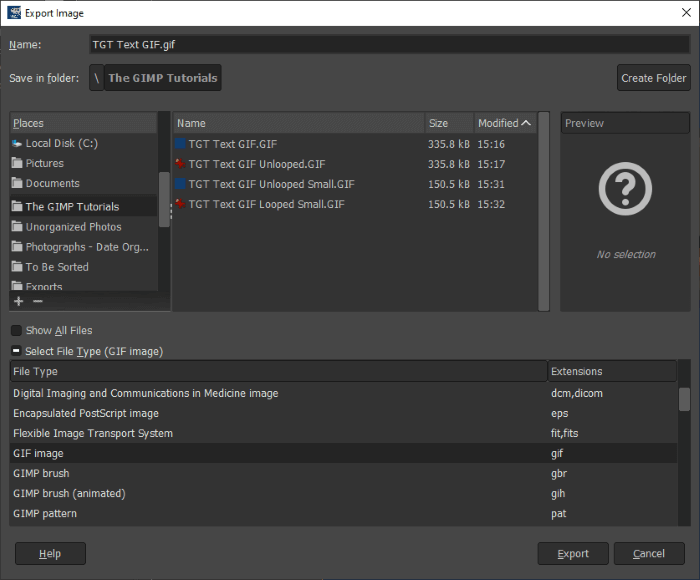
Click the Export button to finish up. Your animation probably has a few image elements outside the boundaries of the image, so GIMP may give you a quick warning about this. Simply click the “Crop” button and GIMP will discard any image content outside the image borders.

Finally, we get to the Export Image as GIF dialog! This includes a few important options that you’ll need to know about.
The only one you absolutely MUST use should be obvious! Check the box marked As animation or your GIF will only display the top-most layer from your layer stack, without animating at all.
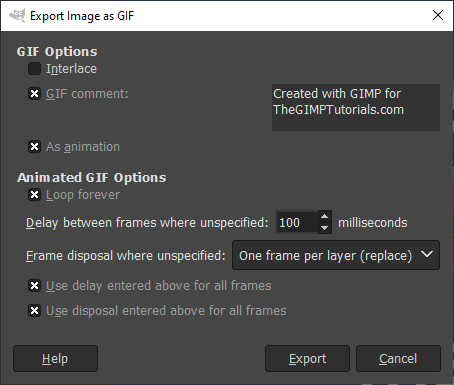
You can also decide whether you want your GIF to loop or not, and how long you want your frames to be displayed.
Frame disposal should be set to One frame per layer (replace) and Use delay entered above for all frames and Use disposal entered above for all frames should both be checked, although you might want to play around with these settings once you’re more comfortable with making GIFs in GIMP.
Click the Export button, and you’re finally well and truly done!
Sit back and enjoy your animation skills, and then start thinking about your next project, because you’ve now learned the basics of how to make a GIF in GIMP! In case you just want to watch the text bounce forever, here’s a looping version of the TGT GIF used in this tutorial:

Greg Shaw
This procedure really isn’t suitable for beginners like me. Please road test it on some beginners, and I am pretty sure that they won’t be able to follow it. I gave up at layer groups – I have no idea what a layer group is or what it’s for, so your favourite method of adding jpg files means nothing to me – maybe recommend the simplest way, not your favourite way, and don’t assume knowledge of other GIMP features. Leave out the jokes about butterflies – all they do is frustrate the reader if he/she can’t work out what the rest of the text is telling them to do.
Thomas Boldt
Hi Greg, perhaps you’re right that I should restructure things a bit for the sake of clarity, but this concept is quite simple, so let me spell it out as clearly as possible: each layer in the layer stack is one frame in your animation, and layer groups are also treated as a single frame of your animation – nothing to it!
A layer group is exactly what it says: a group of layers that can be moved as a single connected unit, and they are entirely optional in this process, so you can simply skip the parts that mention them if they confuse you.
Hey look, another butterfly! *scrolls*
Name
add time by renaming the frame/layer and add to the name “(500ms)” or how much you need.
Thomas Boldt
Another great tip, thanks again!
Alan Kmiecik
everything in there except how to add time to a frame